
Account Linking Using Login With Amazon
This guide provides instructions for you to implement account linking using Login with Amazon (LWA) within Alexa+ to enhance the user authentication experience.
Account linking in Alexa+
Account linking connects a user's identity between their Amazon account and your account. This connection is required for your services that need user authentication in Alexa+. Once linked, users can use your services within Alexa+ to perform actions such as booking appointments, payment transactions, or accessing personalized content.
Currently, there are three established account linking methods for your services in Alexa+:
-
Standard account linking: This method redirects users from the Alexa app to your account login web page for authentication. For details, see Standard Account Linking.
-
App-to-App account linking: This method redirects users from the Alexa app to your mobile app for authentication. For details, see Alexa-Initiated App-to-App Account Linking.
-
Account linking using LWA: This method simplifies the Standard account linking method by enabling users to skip manual login credential entry on your account web page. Instead, users can authenticate directly within the Alexa app using their Amazon user profile. This document describes how to implement this method.
Login with Amazon (LWA)
Login with Amazon (LWA) is Amazon's authentication service allowing customers to use their Amazon user profile to sign into your applications.
Implement account linking using LWA
While LWA is traditionally used as a social login identity provider, its integration with Alexa+ account linking delivers enhanced authentication experiences by enabling:
-
1-tap login via account matching for users with existing accounts created using LWA.
-
2-tap account creation for new users using their Amazon user profile information.
-
Standard login web page fallback for users who wish to link without using LWA credentials.
The value of account linking using LWA lies in dramatically reducing authentication friction and improving conversion rates by simplifying login and account creation steps. Therefore, Amazon recommends implementing account linking using LWA when:
-
You want new users from Alexa+ to seamlessly create accounts and access your services.
-
You already support LWA on your website and/or mobile applications, and you want your users who created accounts using LWA to authenticate seamlessly in Alexa+.
Account linking using LWA user experience flow
The figure illustrates the user experience flow when they use account linking with LWA.

When a user attempts to account link, you perform a user account lookup in your user database. Based on the lookup result, the following may occur:
-
Account Found: The account is automatically linked.
-
No Account Found: User has the option to create a new account using their Amazon user profile instantly.
Additionally, at any step during this process, the user can choose Link A Different Way to fall back to the standard account linking login page and use non-LWA credentials to authenticate.
Prerequisites
Before implementing account linking using LWA, you must complete the following prerequisites:
Step 1: "Explore Alexa+ Services" page onboarding
Alexa+ users start the account linking process from the Explore Alexa+ Services page in the Alexa app. Thus, your service must be made available on that page before configuring account linking. This is not a self-service onboarding process at the moment, please work with your Alexa+ Solutions Architect to complete onboarding if you are not familiar. To learn more about how the user can connect to your service in Alexa app, see Connect Your Third-Party Services to Alexa+.
Step 2: Standard account linking setup
Standard account linking for Alexa+ integration uses the OAuth 2.0 authorization protocol. For high-level requirements, refer to Requirements for Account Linking.
-
If you don't have an OAuth 2.0-compliant authorization service, you need to first implement an authorization server (such as AWS Cognito) that meets OAuth 2.0 requirements before proceeding.
-
If you have an OAuth 2.0-compliant authorization service, please review the Configure Account Linking section for configuration details. We recommend you Configure an Authorization Code Grant as it provides better security through client credentials and supports token refresh mechanisms.
Step 3: LWA social login
3.1 LWA security profile configuration
-
Create an Amazon Developer Account if you don't have one.
-
Follow Register for Login with Amazon to set up your LWA security profile.
-
Add the LWA security profile as an identity provider to your identity management pool if needed (example guides for popular identity management pool: Setting up LWA in AWS Cognito, Setting up LWA in Azure ADB2C).
3.2 LWA social login implementation
Follow the official Amazon documentation to implement LWA social login for each application client where your service is available:
-
Login with Amazon for Android and Fire Apps
Tip: For a fast-track approach, Amazon recommends enabling LWA social login on the client with the most users first. The estimated effort for the first client enablement is one to two weeks, you can continue with Account linking using LWA configuration while working on enabling social login for other clients in parallel.
Account linking using LWA configuration
Overview
This section guides you through configuring account linking using LWA. The implementation involves four key steps that build upon your existing standard account linking and LWA social login setup:
-
Modify frontend account linking consent page to include LWA information if needed
-
Update authorization URI logic to recognize account linking using LWA flow
-
Fetch Amazon user profile from LWA for account lookup
-
Perform LWA account lookup and handle redirect scenarios
Step 1. Modify frontend
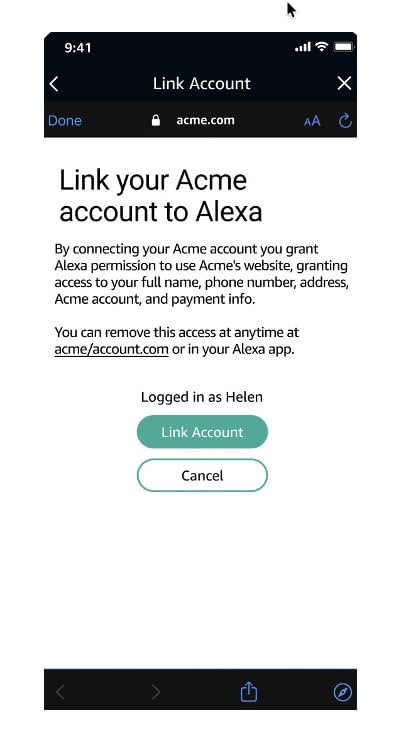
An account linking consent page is presented to the user at the final step of the account linking process requesting user consent to grant Alexa+ permission to your account.
What to do
Update your account linking consent page to include information for LWA if needed.
Example consent page
Step 2. Update authorization URI Logic
Alexa+ may include a new optional query parameter called useLWA when it opens your Authorization URI. This parameter is used to determine whether the request should be directed to account linking using LWA flow or standard account linking flow.
New authorization URI request from Alexa+
GET /api.3PExample.com/login // 3P example authorization URI

Parameters:
   client_id = {client_id}
   redirect_uri = pitangui.amazon.com/api/skill/link{vendor_id}
   response_type = code
   scope = {authorization_scope}
   state = {state_value}
   useLWA = {true|false} // new parameter
What to do
-
If
useLWA = true: proceed with the steps described below to fetch Amazon user profile, lookup user account in your database, and handle new redirect scenarios. -
If
useLWA = falseor if the parameter is absent: proceed with the original standard account linking flow.
Step 3. Fetch Amazon user profile
When useLWA = true is detected in the authorization URI request, you should start the account linking using LWA flow by making API calls to fetch Amazon user profile. First, you need to obtain an LWA access token using the state parameter of the user from the Authorization URI request and the client credentials from your LWA security profile. Then, using the access token, you can retrieve the user's Amazon profile.
3.1 Get LWA access token
What to do
Add an API call to get LWA access token.
API Call
POST /pitangui.amazon.com/api/v1/skills/{identifier}/stages/{stage}/accountLinkingToken
Request Body
    {
    "accountLinkTokenRequest": {
         "state": "string",
         "scope": "string",
         "client_id": "string",
         "client_secret": "string"
    }
    }
| Parameter | Type | Description | Required |
|---|---|---|---|
|
add-on_id |
string |
The identifier of your add-on |
Yes |
|
stage |
string |
The stage of your add-on. Valid values: |
Yes |
|
state |
string |
The state value from the authorization URL request containing encoded validation and user information |
Yes |
|
scope |
string |
The scope of the request. It must be |
Yes |
|
client_id |
string |
LWA security profile client ID from your LWA developer console |
Yes |
|
client_secret |
string |
LWA security profile client secret from your LWA developer console |
Yes |
API response
{
 "access_token": <access_token_value>,
 "token_type": "bearer",
 "expires_in": 3600,
 "refresh_token": <refresh_token_value>
}
3.2 Fetch Amazon user profile from LWA
What to do
Add an API call to fetch the Amazon user profile.
API Call
GET /api.amazon.com/user/profile

Parameters:
   access_token = {access_token_value} // from Alexa API response
API Response
{
    "user_id": "amzn1.acount.K2LI23KL2LK2",
    "email": "customer@example.com",
    "name": "John Doe"
}
Step 4. User account lookup & handle redirect scenarios
After successfully fetching the Amazon user profile, proceed with account lookup and handling redirection:
4.1 Look up user account
What to do
Look up the user_id from the Amazon user profile in your user database to check for a matching account.
user_id to lookup LWA account in your database as email and name fields from the Amazon user profile can be modified by the user while user_id is permanent and unique to each user. For more information about LWA account lookup or creation in your database, see Find or Create a Local Account.
4.2 Handle redirect scenarios
Depending on the result of the user account lookup, you need to update the redirect request from standard account linking with new query string parameters based on different scenarios outlined below. For details of the original redirect URL from standard account linking, see Alexa redirect URLs details.
These are the new redirect URL query string parameters you need to pass:
| Parameter | Description | Requirements |
|---|---|---|
lookup_status |
Status indicating the outcome of the account lookup/creation process. | Values: account_found - matching account exists in your database; account_not_found - no matching account in your database, Alexa app can provide the user with the option to create a new account using LWA; account_created - no matching account in your database and the user chooses to create a new account using LWA. |
consent_status |
Status indicating whether the user consented to account linking. | Values: granted - user granted consent on the account linking consent page; declined - user declined consent on the account linking consent page. |
verification_code |
A temporary security token to maintain connection between LWA authentication session and subsequent account creation process when no matching account is found. This code is validated when the user chooses to create a new account using LWA. | Code Generation: No specific format requirements but avoid extreme complexity or length; TTL (Time to Live): Must have a limited lifetime to prevent misuse; Single-use counter: Must ensure code cannot be reused after once; Internal validation: Must check internally for code matches before proceeding with the new account creation process. |
create_account_uri |
URI to create a new account. | Alexa+ sends a POST request to this URI with the verification_code parameter when the user selects to create a new account using LWA. |
The following scenarios describe how to handle different redirect situations based on the account lookup result:
Scenario A: account found
What happens
LWA user_id matches an existing account in your database.
What to do
-
Generate an authorization code.
-
Render account linking consent page.
-
Redirect to Alexa+ with updated parameters.
https://pitangui.amazon.com/api/skill/link/{vendor_id}
?state={state_value}
&code={auth_code_value}
&lookup_status=account_found // new parameter
&consent_status={granted|declined} // new parameter
Scenario B: no account found, create a new account using LWA
What happens
LWA user_id does not match any existing account in your database. The user has the option to create a new account using LWA.
What to do
-
Generate a verification code following the requirements outlined in the table above.
-
Store a mapping of the verification code to the Amazon user profile from LWA.
-
Redirect to Alexa+ with updated parameters.
https://pitangui.amazon.com/api/skill/link/{vendor_id}
?verification_code={generated_code} // new parameter
&lookup_status=account_not_found // new parameter
&create_account_url={create_account_url} // new parameter
After receiving this redirect URL, the Alexa app displays the option to create a new account using LWA. If the user chooses to create a new account using LWA, Alexa+ sends
POSTrequest tocreate_account_uriwith the verification_code parameter. If not, Alexa+ sends authorization URI request for standard account linking process and display your standard login web page. -
Upon receiving the create account request, validate the verification code and retrieve the mapped Amazon user profile.
-
Create a new account using information from Amazon user profile (ensure the
user_idis stored so the user account can be matched next time). -
Invalidate the verification code.
-
Generate an authorization code.
-
Render account linking consent page.
-
Redirect to Alexa+ with updated parameters.
https://pitangui.amazon.com/api/skill/link/{vendor_id}
?state={state_value}
&code={auth_code_value}
&lookup_status=account_found // new parameter
&consent_status={granted|declined} // new parameter
Related topics
Last updated: Aug 11, 2026
