

Manage testers in your account
To view all tester groups on your account, select Tools & Services > Tester Management from the Developer Console menu.
Tester Management screen
- Add testers
- Add groups
- Edit groups (add testers, delete testers, rename group)
- Delete groups (removes the group from it’s associated live app tests and deletes testers who are not associated with any other group)
- Delete testers from group (if the tester is not associated with any other group, this will delete them from your account)
- Delete testers (this will remove them from your account; they will no longer appear in any groups or live app tests)
- From the Developer Console menu, select Tools & Services > Tester Management.
- Click Add new testers.
-
In the Add new testers dialog, you can either upload a CSV file or add testers individually. You can add yourself as a tester to get an invitation email and be notified that the app is available to download and test.
- If you want to use a CSV file, make sure to list the testers with the format: email,first name,last name in the file.
- If you want to add testers individually, enter the tester’s details directly in the dialog. To add more testers, click Add another tester.

Add new testers dialog
-
In the Add tester to tester group(s) section, add the tester to a group by either creating a new group, or adding them to an existing group:
- To create a new group, click Add new group and enter a name for group. The new group will automatically be selected.
- To add the testers to an existing group, select the checkbox for the existing group.
- Read the statement concerning having rights, tester consent to receive communications, and the age of testers.
- To confirm this statement, select the checkbox next to the statement, and then click Add.
Manage testers for a live app test
To add and manage testers for a live app test, the testers must be part of a existing tester group. For details about how to manage testers and tester groups in your account, see Manage testers in your account. To manage testers at the test level, go to your app’s Live App Testing dashboard and select Manage testers for the in-progress test that you want to manage. Actions you can take at the test level include:- Add testers (from existing tester groups in your account)
- Remove testers (removes testers from the specific live app test only—they remain in your account)
- Reset in-app items for testers
- Resend invitation to testers
- If you don’t have the Live App Testing dashboard open, go to the Developer Console dashboard, sign in to your account, and then select My Apps from the top navigation bar.
-
Find your app in the list, click the menu icon
 , and then select Live App Testing.
- From the Live App Testing dashboard, select Manage testers on the in-progress test.
- On the Manage Testers screen, select Add new testers. A list of all available tester groups in your account appears.
-
Select the checkboxes next to the tester groups that you want to add. If you don’t want to add the entire group, you can expand a group and select the checkboxes next to individual testers.

Add new testers
-
Click Save.
The Manage Testers screen displays a list of the testers you added.
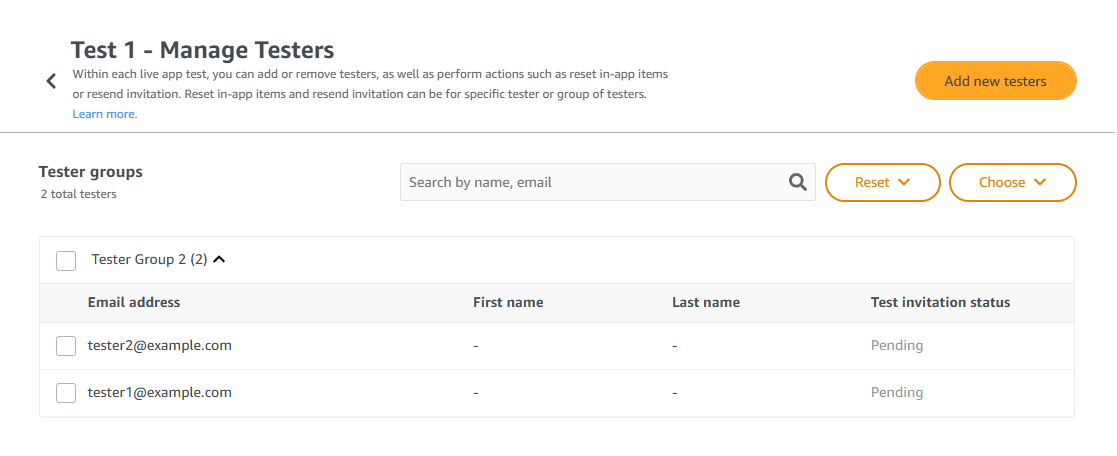
New testers added
Manage existing testers in a live app test
Within a specific live app test, you can perform an action for individual testers or for specific groups of testers. Actions include resending the invitation, resetting in-app items, or removing testers from the live app test. To reset in-app items for testers- From the Live App Testing dashboard, select Manage Testers on the test you want to manage.
- Select the checkboxes next to the testers or tester groups you want to manage.
- Select Reset and choose the action you want to perform for the selected testers:
- Reset entitlements – Resets the in-app purchase entitlements for the selected testers.
- Reset subscriptions – Resets the in-app purchase subscriptions for the selected testers.
- From the Live App Testing dashboard, select Manage Testers on the test you want to manage.
- Select the checkboxes next to the testers or tester groups you want to manage.
-
Select Choose and choose the action you want to perform for the selected testers:
- Remove tester(s) – Removes the selected testers from the live app test. The testers are removed from the tester group only for the specific live app test. The tester will still be associated with the group in other tests and in your account.
- Resend invitation – Resends the LAT invitation to the selected testers. This is useful if a tester misplaced or deleted their invitation email. If you want to resend an invitation to testers that have opted out of LAT emails, they first need to opt back in. Send them the opt-in link found on the Tester Management screen. For details, see .
Tester invitation status
When your LAT app is published, and when you add new testers to a LAT test, the LAT service sends testing invitations to your selected testers. The Manage Testers screen displays the tester invitation status, as shown in the following image. The current status of a tester’s Live App Testing (LAT) invitation is indicated by one of the following:
- Delivered – the LAT invitation has been successfully delivered to the tester.
- Failed – the LAT invitation failed to be delivered to the tester.
- Pending – the LAT invitation has not yet been delivered to the tester.
- Expired – the LAT invitation has expired.
Create a tester account without recurring OTP prompts
For security, when you access a retail Amazon account, Amazon requires that you enter a one-time password (OTP) sent to a mobile number to complete two-step verification. If your testers want to be able to access their test account without requiring an OTP, they can create tester accounts through Amazon Business. After testers create their Amazon Business accounts and you send LAT invitations to those testers, your testers can sign in on a device and start testing your LAT app.Prerequisites
Before you start, make sure to do the following:- Set up a base business account where you can complete all authentication steps, including OTP verification through a mobile phone. You will use this base account to invite testers to create their accounts. The linked tester accounts don’t require recurring OTP verification.
- When creating the business account, avoid using the term “test” in any field.
Send Amazon Business invitations to your testers
Before your testers can create a business account for testing, you must invite them to join the base Amazon Business account that you created. To invite testers to Amazon Business- Sign in to Amazon.com or any Amazon marketplace using the base business account that you set up in the prerequisites.
- From the navigation bar, hover over Account for account name and under Quick Actions, select Add Users.

- In the Add users window, make sure the Invite with email tab is selected.

- Complete the fields:
- In the Email address field, enter the email addresses of your testers.
- In the Role field, choose the role based on your needs. Click the field to display the available roles and their descriptions.
- In the Add to group field, enter the group name that you want to add these users to.
- To send invitations to your testers, click Send invitation.
For testers: Create an Amazon Business account
For testers, after you receive your invitation, you can join your company’s existing Amazon Business account by accepting the invitation and creating a business account. To create an Amazon Business account- Sign in to the email account that the invitation was sent to. In the invitation email, click the invitation link.
-
On the Amazon website, click Accept Invitation. From here, you are taken directly to the Amazon Business account creation page where your email is automatically entered in the Email field.

Amazon Business account creation screen
- Complete the remaining fields and then click Create your Business account.
- Verify your email address by entering the OTP sent to your email. Then click Create your Amazon account.
