

- Monitor all network traffic
- Identify network issues
- Modify requests and responses
- Analyze performance
Prerequisites
Install the following requirements:- Charles Proxy (version 4.6 or higher) For transport layer security (TLS) version 1.3 compatibility, download Charles 5.
- Vega SDK latest version
- A Vega app project
Supported protocols
Configure your app to use one or more of these protocols for the Charles Proxy to capture its traffic:- HTTP
- HTTPS
- XMLHttpRequest
- Media Player requests
- Websocket requests
Set up Charles Proxy
If you previously configured Charles Proxy, but want to add or modify your proxy-config.json file, go to Add or modify proxy-config.json file. If this is your first time setting up Charles Proxy, complete the following steps:- Open Charles Proxy and grant macOS proxy privileges when prompted.
-
Set HTTP Proxy Port to 8888.
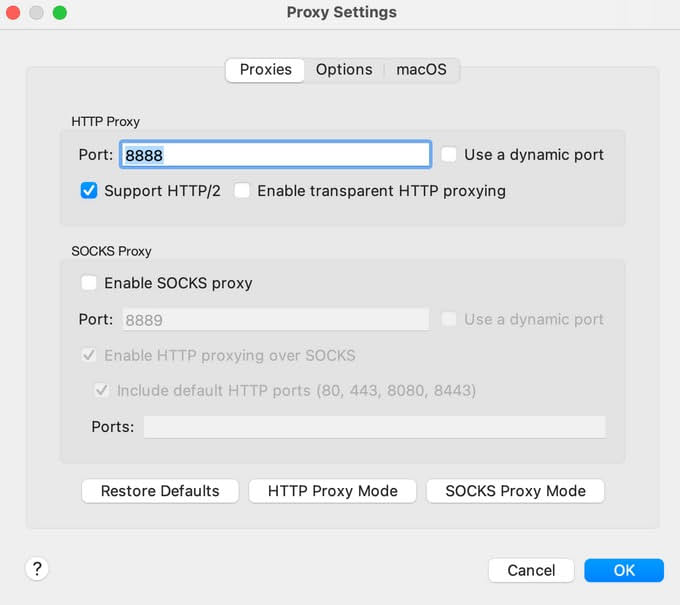 a. Go to Proxy > Proxy Settings.
b. Enter 8888 in the HTTP Proxy Port field.
c. Select OK.
a. Go to Proxy > Proxy Settings.
b. Enter 8888 in the HTTP Proxy Port field.
c. Select OK.
-
Configure Secure Sockets Layer (SSL) Proxying.
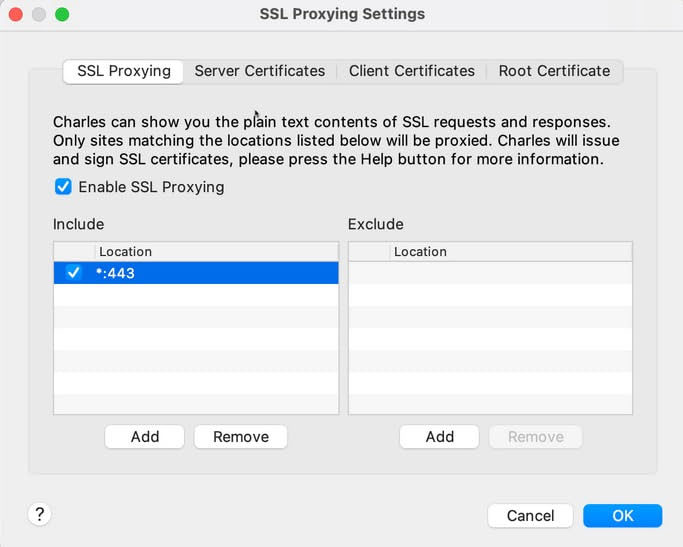 a. Go to Proxy > SSL Proxying Settings.
b. Select the SSL Proxying tab.
c. Select Add in the Include section.
d. Leave the Host box empty in the Edit Location dialog.
e. Enter 443 in the Port field.
f. Select OK.
a. Go to Proxy > SSL Proxying Settings.
b. Select the SSL Proxying tab.
c. Select Add in the Include section.
d. Leave the Host box empty in the Edit Location dialog.
e. Enter 443 in the Port field.
f. Select OK.
- Generate a root certificate. a. Go to Help > SSL Proxying > Save Charles Root Certificate. b. Enter proxy-cert.pem in the Save As field. c. Save the certificate in your preferred location. d. Select Save.
Add Charles Proxy to your Vega apps
-
At the command prompt, navigate to your app:
For example:
-
Clean the project:
- Create an assets/raw folder in your project directory.
- Move the proxy-cert.pem file to the assets/raw folder.
-
Create a proxy-config.json file in the assets/raw folder.
Example proxy-config file:
Debug your app
-
Install dependencies:
-
Run and build your app:
- Install the app on your Vega Virtual Device or Fire TV Stick.
Monitor Traffic
- Go to Proxy > Start Recording.
- Launch your app on your Vega Virtual Device or Fire TV Stick. Charles Proxy displays the network requests made by your app. You can view the details in the Structure or Sequence tab.
-
Test Charles connection:
Set up port forwarding
Port forwarding directs the device to send requests meant for a specific port to your computer instead. Complete these steps only for Fire TV Stick (not needed for the Vega Virtual Device):-
At the command prompt, run:
Example:
-
Delete the following files before submitting your app for production:
- proxy-config.json
- certificate files (for example, assets/raw/proxy-cert.pem)
-
Clean and rebuild your project:
a. Clean
b. Installc. Build
Add or modify proxy-config.json file
To update your configuration:- Complete initial proxy setup Complete the steps in Set up Charles Proxy.
- Remove the existing app Uninstall your existing app.
- Deploy the updated app Install your new app.
Use Charles Proxy across multiple machines
Learn how to monitor Vega app network traffic across development and test machines. Use this approach to share a.vpkg configured with Charles proxy for team testing.
On the development machine
- Complete the steps in Set up Charles Proxy.
-
Export the root certificate and private key:
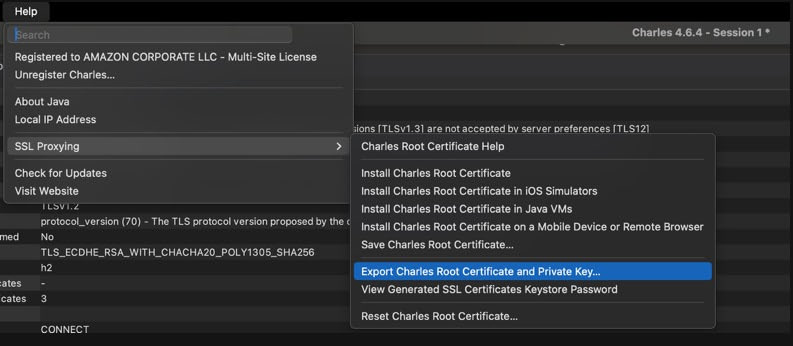 a. Go to Help > SSL Proxying > Export Charles Root Certificate and Private Key.
b. In the Export Charles Root Certificate and Private Key dialog:
a. Go to Help > SSL Proxying > Export Charles Root Certificate and Private Key.
b. In the Export Charles Root Certificate and Private Key dialog:
- Set a strong password (securely share this information with your testers later)
- Name the file (for example,
proxy-root-cert-private-key.p12) - Choose a download location
-
Extract the root certificate using one of the following options:
Option 1 (Preferred):
a. Go to Help > SSL Proxying > Save Charles Root Certificate.
b. Name the file (for example,
proxy-cert.pem). Option 2 (Using OpenSSL): - Complete the steps in Add Charles Proxy to your Vega apps.
-
Securely share the following information with your testers:
- proxy-root-cert-private-key.p12 file
- password
On the test machine
Testers should complete this section.- Configure the test machine proxy Complete the steps in Set up Charles Proxy.
-
Import the shared certificate.
 a. Go to Proxy > SSL Proxying Settings > Root Certificate > Import P12.
b. Select the shared proxy-root-cert-private-key.p12 file.
c. Enter the password provided by your development team.
a. Go to Proxy > SSL Proxying Settings > Root Certificate > Import P12.
b. Select the shared proxy-root-cert-private-key.p12 file.
c. Enter the password provided by your development team.
- Configure test machine port forwarding Complete the steps in Set up port forwarding.
- Monitor test machine traffic Complete the steps in Monitor traffic.
Best practices for SSL configuration
To ensure reliable operation with Charles Proxy:- Verify your
proxy-config.jsonfile has correct formatting and certificate paths. - Start Charles Proxy before launching your app.
Troubleshooting
If you encounter issues when using Charles Proxy with Vega development tools, see [Charles Proxy Troubleshooting](charles-proxy- issues.html) for common problems and solutions.Related topics
- Charles Proxy documentation.
- Enable VDA Over TCP/IP
