

Client-server configuration
Amazon recommends that you set up a private network with one server and one or more distributed client machines at your factory. You should properly safeguard the server from unauthorized physical access and have proper user access control in place. You secure a Certificate Authority certificate (CA) certificate and hardware security module (HSM) key on the server. In the provisioning flow, the client reads the module over a serial connection and sends an HTTPS request containing the extracted Certificate Signing Request (CSR). The server then signs the certificate and returns it to the client. In addition, the server maintains a secure data store of information about devices provisioned for production.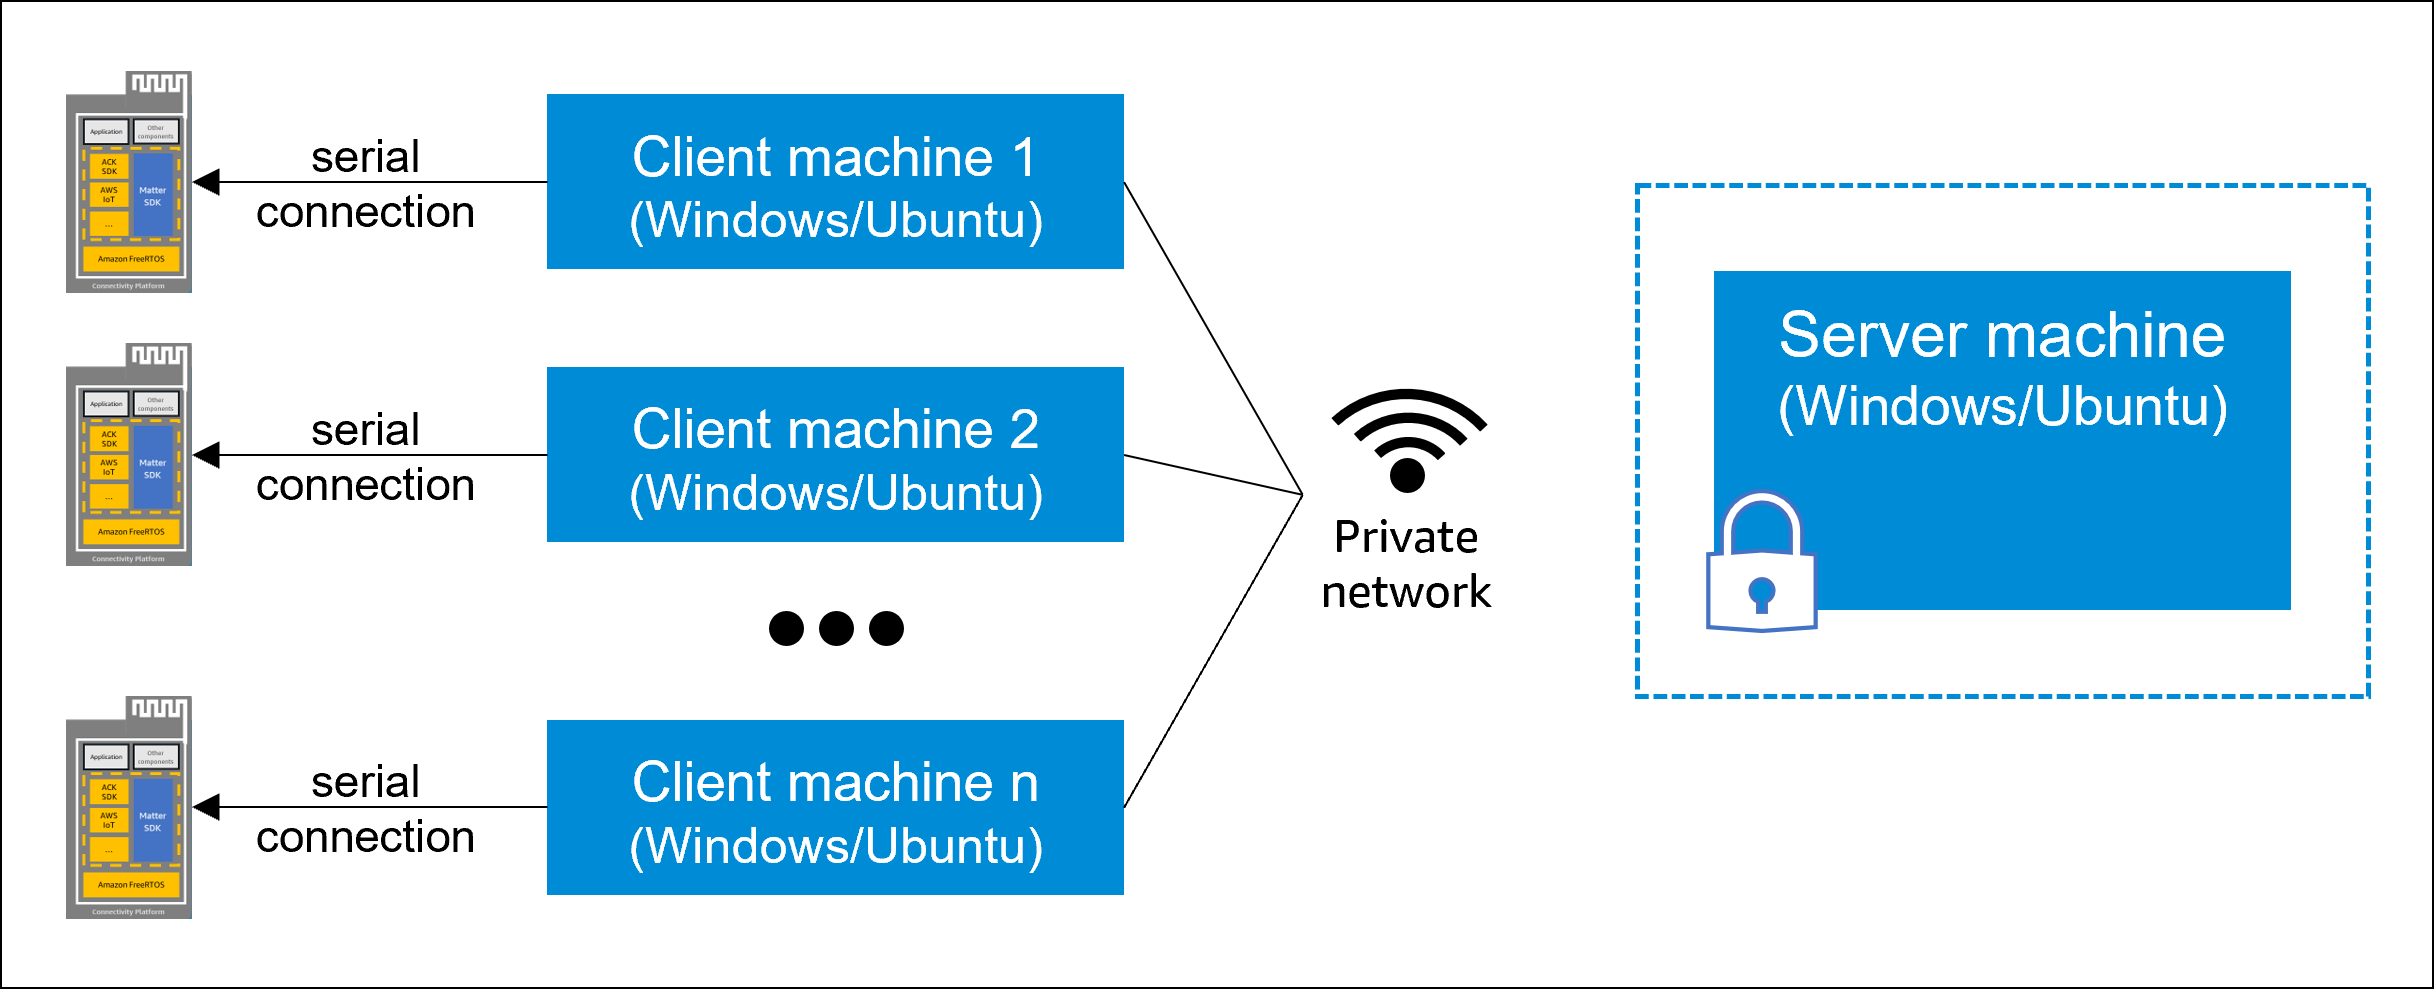
Client-Server configuration for module provisioning
Prerequisites
Before you start, make sure that you have the following items:- A Windows 10 server machine with a USB port to connect the HSM key and a secure data store to store information about provisioned devices.
- Windows 10 client machines with a USB port to connect to the serial port on the module.
- Set the system time to the current real time on both the server and the client machines.
- Access to the ACK SDK tools package provided by your ACK support engineer.
To start a project, see apply for an ACK project. - Client-Server network with multiple clients and a secured server connected to the same local Wi-Fi or wired network. Configure the network firewall to reject HTTPS requests from outside the network, and don’t expose your server machine to the public network.
- (Recommended) Within your local network, to increase security, set up a virtual local area network (VLAN) that contains only your server and client machines. A VLAN prevents devices in the same network from making HTTPS requests to your server.
Steps to configure server and client machines
Complete the following steps to download and install required tooling packages to manufacture your product for production.- Install ACK SDK tools.
- Install Python cryptographic token interface.
- Install HSM software.
- Set up the server.
- Set up client machines.
- Start the server.
Step 1: Install ACK SDK tools
In this step, you install the ACK SDK tools package on your server and client machines. Before you start, make sure that you have Python 3.10 and the Python package manager.Verify Python version
Verify Python version
To check the version of python installed on your machine, enter the following command at the Microsoft command prompt.
- To download the ACK SDK tools package, navigate to the tools folder in the AWS S3 bucket, and then download the
ACK_SDK_Tools-matterzip file. - To extract the files into a destination folder, enter the following command in a Windows terminal.
- To install the
acksdktoolspackage, navigate to the destination folder, and then, enter the following command.
- To verify the ACK SDK tools installed correctly, enter the following command.
- Verify that you see the
acksdktoolspackage in the list.
Step 2: Install Python cryptographic token interface
If you have a YubiHSM or SmartCare-HSM hardware security module, installpython-pkcs11 library from source on your server.
To install the python cryptographic token interface package
- Open Microsoft C++ Build Tools, and then, to download the Visual Studio Installer, click Download Build Tools.
- Open the Visual Studio Installer, and then, under the Workloads tab, check the Desktop development with C++ installation option. Don’t select any additional options.
- Click Install.
- Clone the
python-pkcs11source code to any location. - In a terminal window, navigate to the new
python-pkcs11folder, and then enter the following commands at the command prompt.
- To verify a successful installation, enter the following command.
-
Verify that you see the following result.
Requirement already satisfied: python-pkcs11 in ... -
In a convenient place, such as Notepad on Windows, paste the directory path where you installed the package.
The default directory isC:\Program Files\OpenSC Project\OpenSC\pkcs11\onepin-opensc-pkcs11.dll.
Step 3: Install HSM software
ACK-specific steps in manufacturing use HSM to create cryptographic keys that secure your product. ACK supports two HSM types: SmartCard-HSM or YubiHSM. In this step, install the software required for your HSM type on your server. To install HSM software- SmartCard-HSM
- YubiHSM 2 FIPS
To install software for SmartCard-HSM
- Install OpenSC for use with SmartCard-HSM based on your server OS.
For more details, see OpenSC documentation. - In the Windows Control panel, open Edit the system environment variables.
- Add the following path to the Path variable.
Step 4: Set up the server
In this step, you generate the CA certificate for HTTPS requests to the server and create the data folder to store issued device serial numbers (DSNs), control logs, and audit logs. To set up the server machine- Set the time on the computer hosting the server to the current real time.
- To find the local IP address of the server, enter the following command in a Windows PowerShell terminal window.
- Generate a CA certificate.
You can find the generated certificate in<hostname>.pem.
- Generate authentication tokens for the client machines to connect to the server.
- Create a folder to store the control logs, audit logs (for Matter), and the database of issued DSNs.
Create one folder per device type. Example for device type ID ABCD1234:C:\Users\user1\Documents\ACKserver\ABCD1234
Make sure that the HTTPS user has read and write access to the folder. - To create SFTP upload and feedback endpoints for control logs, follow the instructions on the FFS > Control Logs console.
- In a convenient place, such as Notepad on Windows, paste the upload and feedback endpoints and the control log passphrase. You use these to upload the control files to Amazon.
Step 5: Set up client machines
In this step, you copy the CA, token, and configuration files required for provisioning to the client machine. To set up client machines- Set the time on the client machine to the current real time.
- Connect the client machine to the module by using
screenorPuTTY.
For details, see Connect your host machine to the development kit. - Download the Provisioning configuration file that you generated for the prototype,
ProvisioningInfo_<device_type>.conf. - Securely copy
<hostname>.pemfrom the server to the client machine.
You can find the generated certificate on the server. - Securely copy a token file from the server to the client machine. Don’t add the same token file to more than one client.
You can find the token files inpath/to/data/folderon the server. - Repeat steps 1–5 for each client machine.
Step 6: Start the server
When you start the server, you start the ACK server and the YubiHSM server. Before you start the server in production mode, you can test the server in dry-run mode without an HSM to verify the network connection. To start the ACK server, make sure you have the two passcodes from Amazon.- Dry-run Mode
- Production Mode
To start the server in dry-run mode
- To test the server-client connectivity without an HSM, in a terminal window on the server, enter the following command at the command prompt to start the ACK server.
Include thehsmcommand option.
- To send a test request to generate a DSN, in a terminal window on a client machine, enter the following command at the command prompt.
- On success the command displays the generated DSN in JSON format.
For example:{"dsn":"EMKKMXEN8PT7BRAF2D"} - If the command returns
HTTP 500 Server Error, check the server log printed in the terminal. - If the request times out, check the network firewall configuration.
- If the request returns
HTTP 401 Unauthorized, verify that you downloaded the correct authentication files to the client machine. - After you verify client-server connectivity, to stop the ACK server process, enter
Ctrl+Con Ubuntu orCtrl+Breakon Windows.
Stop the ACK server
You might stop the ACK server for a variety of reasons, including uploading control logs, stopping the production run, and more. To stop ACK server, on the terminal window where theackserver process is running, enter Ctrl+C on Ubuntu or Ctrl+Break on Windows.
