Alexa Blogs
This new technical tutorial by Sr Solutions Architect for Amazon Alexa, Sebastien Stormacq will show you how to use Amazon API Gateway and configure it to act as a HTTP Proxy, sitting between Alexa and your OAuth server.
Have you ever developed an Alexa skill that uses account linking? Do you remember the first time you tried to click on the “Link Account” button and feared for the result? I bet you first saw the dreadful error message: “Unable to Link your skill”. Sometimes trying to figure out what an error is, is like searching for a needle in a haystack. You have no clue.
Most of the errors that I have seen when working with developers, fall in two categories:
- Error of configuration inside the Alexa developer console. These are the easy ones to catch. We just need to compare the configuration with a working one, such as the one described in this blog post.
- Errors at the OAuth Server level. These most often happen when you are developing your own OAuth server and it is not fully compliant with OAuth 2.0 specifications.
When you have access to the OAuth server logs, debugging the error message you see in the Alexa App is relatively easy. You just enable full HTTP trace on the server side and search for the error or the misconfiguration on the server. Full HTTP trace includes the full HTTP headers, query string and body passed by the Alexa service to your server.
With a bit of experience, catching an OAuth error in HTTP stack trace takes only a few minutes.
The problem is that most developers we are working with, have no access to the OAuth servers or the server logs. Either they are using a third party OAuth server (Login With Amazon, Login With Facebook, Login with Google and the likes), or they are working in a large enterprises where another team is operating the OAuth server. Meeting that team and asking them to change logging level or to request access to the logs can take weeks, or may not be possible at all.
This article explains how to setup an HTTP proxy between Alexa Skill Service and your OAuth server to capture all HTTP traffic and log it. By analyzing the logs, you can inspect the HTTP URLs, query strings, headers and full bodies exchanged. Setting such a proxy requires infrastructure to host the proxy: a networked server, with a runtime to deploy your code etc … this is unnecessary heavy lifting where Amazon Web Services can help.
We will use Amazon API Gateway instead and will configure it to act as an HTTP Proxy, sitting between Amazon’s Alexa Skill Service and your OAuth server.
Amazon API Gateway is a fully managed service that makes it easy for developers to create, publish, maintain, monitor, and secure APIs at any scale. With a few clicks in the AWS Management Console, you can create an API that acts as a “front door” for applications to access data, business logic, or functionality from your back-end services.
API Gateway HTTP Proxy Integration mode is a new feature of API Gateway that was launched on Sept. 20th 2016. You can read the post by AWS Director of Evangelism, Jeff Bar’s, if you want to learn more about this.
The diagram below shows where API Gateway, with HTTP Proxy Integration, fits in the OAuth Architecture.

High level steps to create such a configuration are:
- Create an API Gateway API
- Configure the API Gateway to work in HTTP Proxy Integration mode. In that mode, the API Gateway passes the entire requests and responses between the front end and your OAuth server.
- Configure Account Linking Authentication URL and Access Token URL in the Alexa developer console to point to the API Gateway
- Trigger an account linking flow from your Alexa app
- Use Cloudwatch Logs to see the full HTTP trace of the traffic exchanged between Alexa and your OAuth server.
If you are new to AWS, setting up and configuring an API Gateway might be intimidating. This is why we created a CloudFormation template for you to get you started in minutes.
CloudFormation is an AWS service that enables you to describe your AWS resources as a JSON file, these JSON files can later be ‘executed’ to tear up and tear down your AWS environments. This gives us a number of benefits, including version control and repeatability. You can read more about AWS CloudFormation in general over in the AWS developer docs here.
You can download the CloudFormation templates from this link. Chose the template matching the region where you will execute it, either us-east-1 (Northern Virginia) or eu-west-1 (Ireland)
When executing the template, it will prompt you for the OAuth Authentication URL and the Access Token URL and then create an API Gateway and configure it as in HTTP Proxy Integration mode for you. It will then output two URLs, one for authentication and the other for the access token. You can use these URLs in the Alexa Developer console to configure account linking on your skill.
Warning : this template has been optimized to run from the Northern Virginia or Ireland regions (us-east-1 and eu-west-1) and will not work from other regions. In the rest of this document, we are assuming you are using Northern Virginia (us-east-1) region, do not forget to adjust slightly for Ireland (eu-east-1).
Let’s go through this step by step:
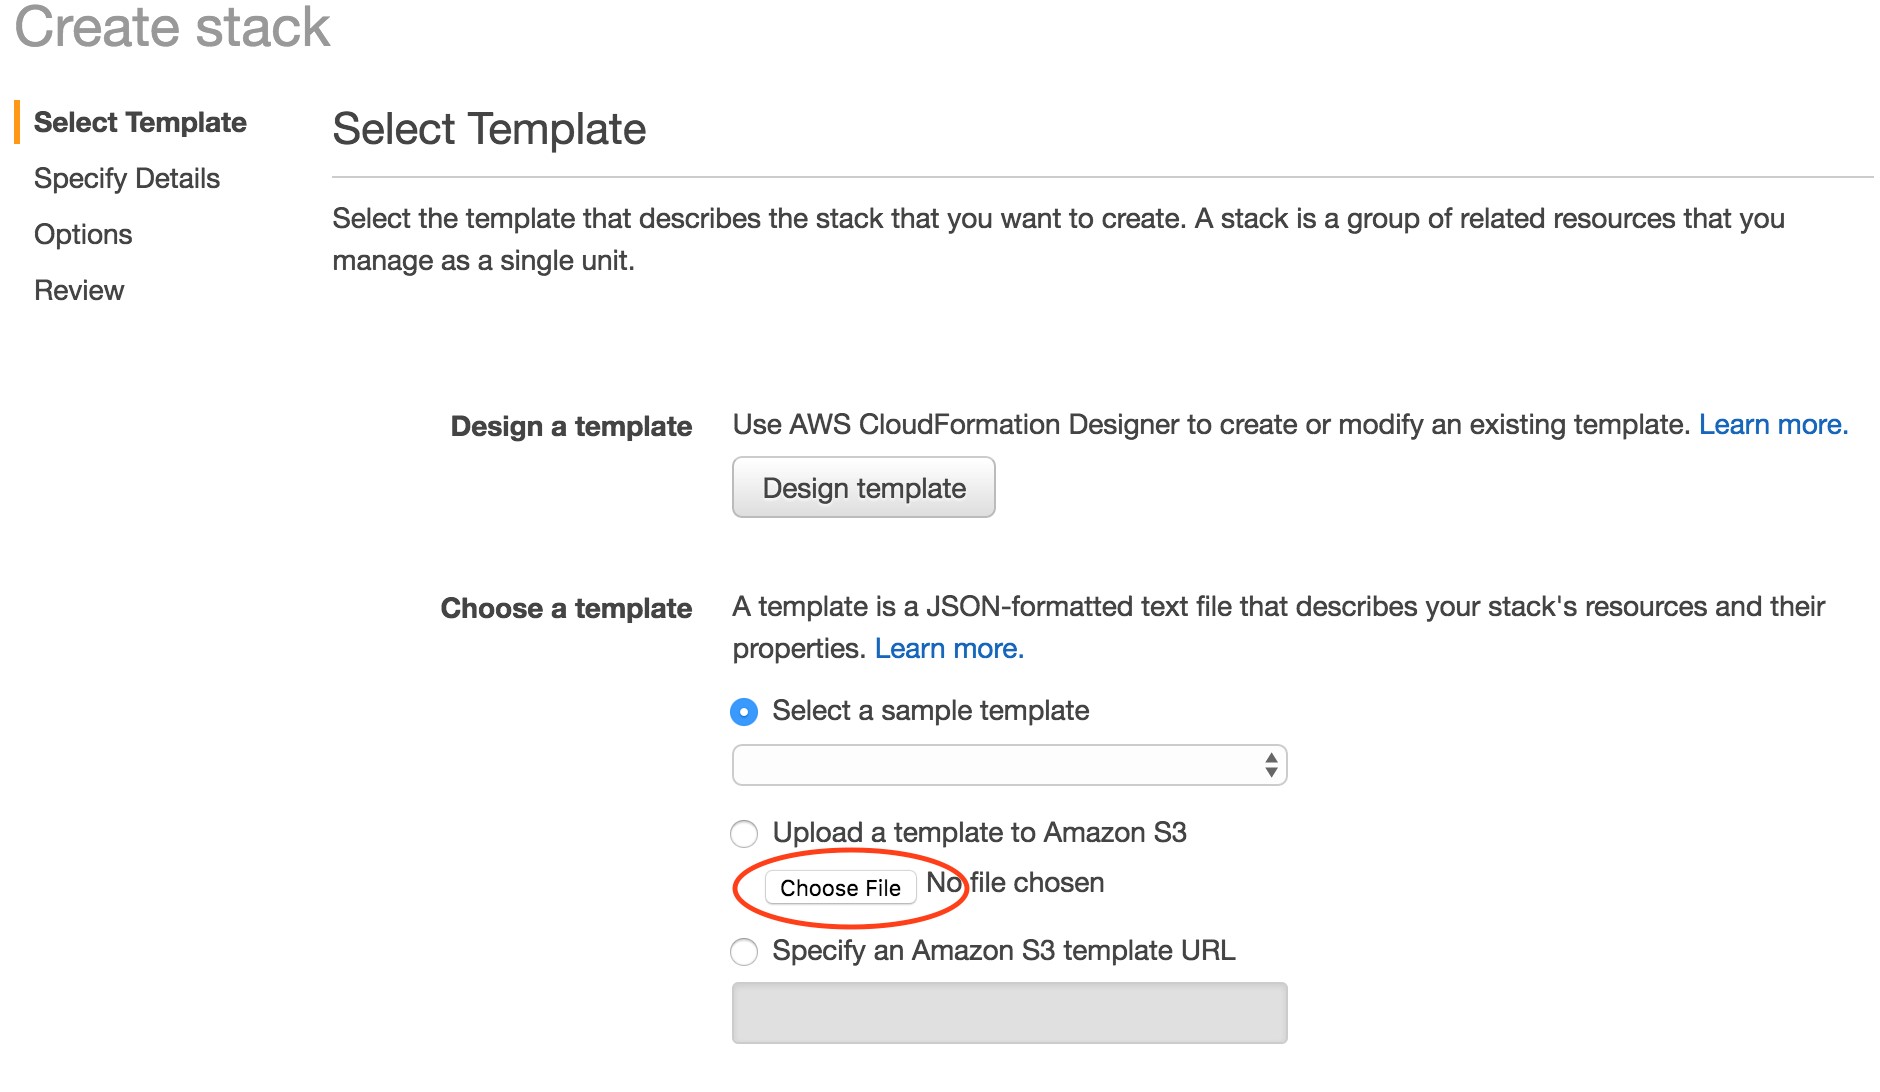
1. In the AWS Console, open CloudFormation and verify you’re well connected to N. Virginia (us-east-1) region, then click on “Create Stack”

2. Click on “Choose File” and select cloudformation-us-east-1.json downloaded from the link above.

3. Click Next on the bottom on the screen
4. Give your stack a name, such as “HTTPProxy” and the two URLs needed to connect to on your OAuth server; the authentication URL and the access token URL. The template gives the ones for “Login With Amazon” by default, be sure to type the correct values for your authentication server. Click “Next” when ready.

5. Ignore the settings on the following screen and click “Next” again.
6. On the last screen, review your settings and click on the checkbox “I acknowledge that AWS CloudFormation might create IAM resources.”

The reason why this box is present is because the template asks CloudFormation to create an IAM role to authorize API Gateway to send its log to CloudWatch Logs. The template also creates a Lambda function to perform on the fly some URL parsing required to configure the API Gateway. A second IAM role is created to allow the Lambda function to send its own logs to CloudWatch Logs.
The creation of the stack should take 1-2 minutes; maybe time for a very short coffee break, like an expresso. When you return, the stack status must be CREATE_COMPLETED. If you have an error (ROLLBACK_COMPLETED), click on the “Event” tab just below and scroll down to search for the very first error in the stack. Usually error messages are descriptive enough to help you figure out what went wrong.

Congratulations! Now the API Gateway is up and running, ready to accept requests. Next steps are to configure Account Linking in the Alexa developer console to point to the API Gateway.
7. Click on the “Outputs” tab to copy / paste the two URLs that have been created for you and report them to the Alexa developer console.

Pay attention when copy / pasting. ProxyAuthenticationURL goes to “Authentication URL” in the Alexa developer console and ProxyAccessTokenURL goes to “Access Token URI” in the Alexa developer console.

8. Trigger an authentication on your skill and test your setup.
If everything goes well, and if account linking was working before making this change, it must still work. The difference now is that all the HTTP traffic between Alexa and your OAuth server is logged into CloudWatch Logs.
In the AWS Console, open CloudWatch and click on Logs. You should see three new Logs Groups.

The “Lambda” one contains the log of a temporary lambda function used during the stack creation only.
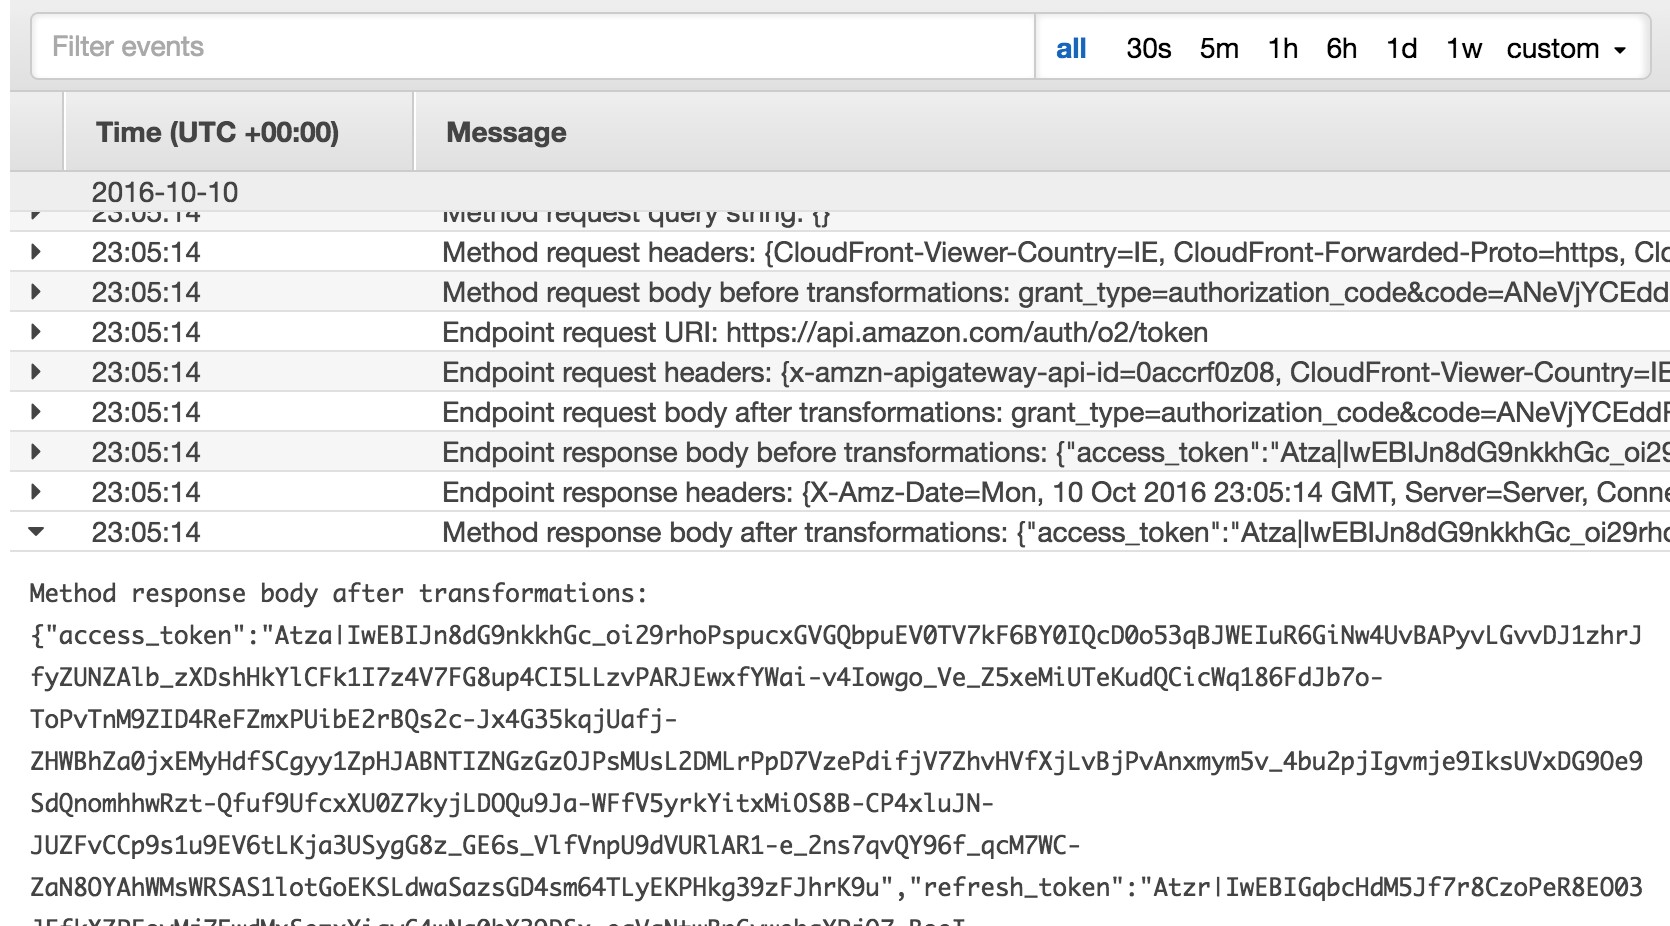
The “API Gateway Execution” contains the log of your traffic. This group contains hundreds of streams, you can sort them by date to see the ones that recently received new logs.
9. Click on “API-Gateway-Execution-Log_*” to open the group, sort the streams by date and click on the last one or the one before last. One contains the request to your Authentication URL, the other the request to your Access Token URL.
By looking at the logs, you can see entries for your request (path, query string, headers, body) and for the response.

Enjoy! You know have a full HTTP logging system to debug your OAuth configuration.
Once you will finish your debugging session, do not forget to tear down the infrastructure to minimize your costs and exposure. You can delete the entire setup from the AWS CloudFormation console, just click on “Delete Stack” to delete everything except the log files. Log files are preserved for you for later analysis.
How much does it cost?
API Gateway is a very cost effective service, AWS will charge you $3.5 per million requests received + $0.09 / GB for data transfer.
AWS Cloudwatch Logs will charge you $0.50 / GB for storage log files and it is very unlikely you pass the part of 100 Mb for a single logging session.
Hypothetically, let's say you are running a debugging session with 10.000 HTTP requests, 200 bytes each, it will cost you
0,01 million requests x $3.5 = $0.035
200 bytes x 10.000 x 2 (in and out) = 0.004 Gb data transfer x $0.09 / Gb = $0.00039
Logs (assuming logs are 10x more verbose than content) : 0.04 Gb x $0.05 / Gb = $0.002
Total: $0.035 + $0.00039 + $0.002 = $0.03739
In this scenario, running debugging sessions for a few days with thousands of HTTP requests will cost you less than a dime.
Keep us posted
Are you having problems following these instructions? Or the API gateway configuration does not work with your OAuth server? Let us know by posting a message in the Alexa Developer forums or by tweeting us @AlexaDevs.
