---
title: Add the Amazon Pay button
url: mobile-app-saved-wallet-eoc/add-the-amazon-pay-button.html
---

* TOC
{:toc}
{::options toc_levels="3..4" /}

The Amazon Pay checkout experience starts when the buyer clicks on the Amazon Pay button. Add Amazon Pay to the payment selection at the end of checkout of your shop. You have 2 options for adding AmazonPay button: Call AmazonPay’s **renderButton** method to render AmazonPay button and handle button click, or create a custom button and call AmazonPay’s **initCheckout** method to handle button click.

### Android

#### 1. Add .aar file under your “lib” folder of your Android app project
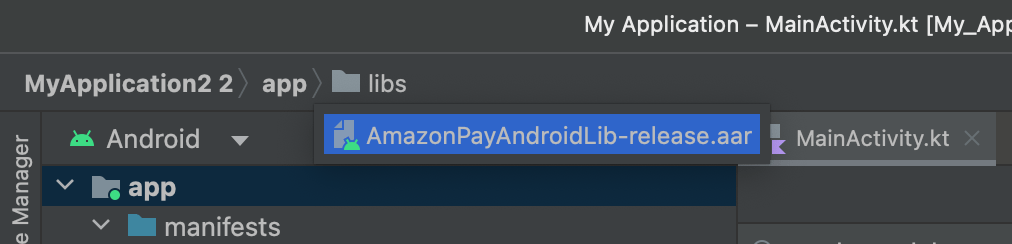
Copy the `.aar` file from the Android bundle you’ve downloaded to the `/app/lib` folder in your Android project directory.

<img style="width: 100%" src="https://m.media-amazon.com/images/G/01/amazonpayments/documentation/Mobile_SDK/onetime-eoc/onetime-eoc-android-1._CB563458935_.png" />

#### 2. Add Dependencies

In your module-level `build.gradle` file, add the following dependencies:

```
apply plugin: 'kotlin-kapt'

dependencies {

    implementation fileTree(include: ['*.jar', '*.aar'], dir: 'libs')
    releaseImplementation files('libs/AmazonPayAndroidLib-release.aar')

    implementation 'androidx.activity:activity-compose:1.9.0'
    implementation platform('androidx.compose:compose-bom:2024.06.00')
    implementation 'androidx.compose.ui:ui'
    implementation 'androidx.compose.ui:ui-graphics'
    implementation 'androidx.compose.ui:ui-tooling-preview'
    implementation 'androidx.compose.material3:material3'

    implementation 'androidx.appcompat:appcompat:1.7.0'
    implementation 'androidx.core:core-ktx:1.13.1'
    implementation 'org.jetbrains.kotlinx:kotlinx-serialization-json:1.6.3'
    implementation 'org.jetbrains.kotlin:kotlin-stdlib:1.9.22'
    implementation 'org.jetbrains.kotlin:kotlin-reflect:1.9.22'
    implementation 'com.android.volley:volley:1.2.1'
    implementation 'androidx.browser:browser:1.8.0'
    implementation 'androidx.lifecycle:lifecycle-runtime-ktx:2.8.3'
    implementation 'com.google.dagger:dagger:2.51.1'
    kapt 'com.google.dagger:dagger-compiler:2.51.1'
    implementation 'com.google.dagger:dagger-android:2.51.1'
    implementation 'com.google.dagger:dagger-android-support:2.51.1'
    kapt 'com.google.dagger:dagger-android-processor:2.51.1'
}
```

After you have added the dependencies in your module-level build.gradle file, got to the Android Studio menu, select `File`, and then click `Sync Projects with Gradle Files` to make sure the project is synchronized with the updated dependencies.

#### 3. Render Button

To render the button, you have 2 options:
1. Invoke `renderButton` to display a Composable Amazon Pay button.
2. Create your button and call `initCheckout` when clicked.

##### 3.1 Call renderButton method

The renderButton method accepts a JSON object as input and returns a Composable button. You can use the JSON object to trigger one of the 5 supported flows by using the <a href="#button-render-parameters">1. Button render parameters</a>

Here is an example of creating a Composable Amazon Pay button with the One-Time End-Of-Checkout flow using the PayAndShip product type by calling the renderButton method:

```
import com.amazonpay.android.AmazonPayButton

@Composable
fun SavedWalletEndofCheckoutPayAndShipButton() {

    // Initiate a JSONObject as the input of renderButton() method
    val jsonObject = JSONObject()
    jsonObject.put("merchantId", "A2Y3FXLHM8H7PR")
    jsonObject.put("placement", "Cart")
    jsonObject.put("checkoutLanguage", "en_US")
    jsonObject.put("ledgerCurrency", "USD")
    jsonObject.put("productType", "PayAndShip")
    jsonObject.put("sandbox", false)
    jsonObject.put("useUniversalLink", true)

    // Creating checkoutSessionConfig
    val checkoutSessionConfig = JSONObject()

    // Adding storeId
    checkoutSessionConfig.put("storeId", "amzn1.application-oa2-client.456a4c3b15d24aae96256d2f82afdd73")

    // Creating webCheckoutDetails 
    val webCheckoutDetails = JSONObject()
    webCheckoutDetails.put("checkoutResultReturnUrl", "https://www.testMerchant.com/return")
    webCheckoutDetails.put("checkoutCancelUrl", "https://www.testMerchant.com/cancel")
    webCheckoutDetails.put("checkoutErrorUrl", "https://www.testMerchant.com/error")
    webCheckoutDetails.put("checkoutMode", "ProcessOrder")

    // Adding webCheckoutDetails to checkoutSessionConfig
    checkoutSessionConfig.put("webCheckoutDetails", webCheckoutDetails)

    // Creating scopes array
    val scopesArray = JSONArray()
    scopesArray.put("name")
    scopesArray.put("email")
    scopesArray.put("phoneNumber")
    scopesArray.put("billingAddress")

    // Adding scopes to checkoutSessionConfig
    checkoutSessionConfig.put("scopes", scopesArray)

    // Creating paymentDetails object
    val paymentDetails = JSONObject()
    paymentDetails.put("paymentIntent", "Confirm")
    paymentDetails.put("canHandlePendingAuthorization", false)

    // Creating chargeAmount object
    val chargeAmount = JSONObject()
    chargeAmount.put("amount", "1.00")
    chargeAmount.put("currencyCode", "USD")

    // Adding chargeAmount to paymentDetails
    paymentDetails.put("chargeAmount", chargeAmount)

    // Adding paymentDetails to checkoutSessionConfig
    checkoutSessionConfig.put("paymentDetails", paymentDetails)
    
    //Creating PMOF fields
    checkoutSessionConfig.put("chargePermissionType", "PaymentMethodOnFile")
    
    val paymentMethodOnFileMetadata = JSONObject()
    paymentMethodOnFileMetadata.put("setupOnly", false)

    checkoutSessionConfig.put("paymentMethodOnFileMetadata", paymentMethodOnFileMetadata)

    // Creating addressDetails object
    val addressDetails = JSONObject()
    addressDetails.put("name", "Alice Test")
    addressDetails.put("addressLine1", "829 Stendhal Ln")
    addressDetails.put("addressLine2", JSONObject.NULL)
    addressDetails.put("addressLine3", JSONObject.NULL)
    addressDetails.put("city", "Cupertino")
    addressDetails.put("districtOrCounty", JSONObject.NULL)
    addressDetails.put("stateOrRegion", "CA")
    addressDetails.put("postalCode", "95014")
    addressDetails.put("countryCode", "US")
    addressDetails.put("phoneNumber", "211901222")

    // Adding addressDetails to checkoutSessionConfig
    checkoutSessionConfig.put("addressDetails", addressDetails)

    // Adding checkoutSessionConfig to main jsonObject
    jsonObject.put("checkoutSessionConfig", checkoutSessionConfig)

    // Pass jsonObject as the input, and call RenderButton method
    AmazonPayButton.RenderButton(config = jsonObject)
}
```

#####  3.2 Render your Own Button & call InitCheckout method
You can create your own Amazon Pay button by downloading the official Amazon Pay logo.

This section provides the steps for downloading the official Pay with Amazon button label and pairing it with an Android button.

**1.** Download Amazon Pay button labels.

<table width="100%" border="1">
    <tbody>
        <tr id='SPI9CAvz30I'>
            <td id='s:SPI9CAvz30I;SPI9CAwqfh9' style='vertical-align: top; font-weight: bold ; width: 35%' class='bold'>Name
                <br /></td>
            <td id='s:SPI9CAvz30I;SPI9CAy6rIp' style='vertical-align: top; font-weight: bold; width: 65%' class='bold'>Usage
                <br /></td>
            <td id='s:SPI9CAvz30I;SPI9CAy6rIp' style='vertical-align: top; font-weight: bold; width: 65%' class='bold'>Download-Link
                <br /></td>
        </tr>
        <tr id='SPI9CAIyYS4'>
            <td id='s:SPI9CAIyYS4;SPI9CAwqfh9' style='vertical-align: top;'>Primary label<br></td>
            <td id='s:SPI9CAIyYS4;SPI9CAwqfh9' style='vertical-align: top;'>Default label<br></td>
            <td id='s:SPI9CAIyYS4;SPI9CAwqfh9' style='vertical-align: top;'><a href="https://m.media-amazon.com/images/G/01/AmazonPay/ux/squid_ink_pwa.svg" target="_blank" rel="noopener noreferrer">svg</a></td>
        </tr>
        <tr id='SPI9CAIyYS4'>
            <td id='s:SPI9CAIyYS4;SPI9CAwqfh9' style='vertical-align: top;'>Secondary label<br></td>
            <td id='s:SPI9CAIyYS4;SPI9CAwqfh9' style='vertical-align: top;'>Use on dark background only<br></td>
            <td id='s:SPI9CAIyYS4;SPI9CAwqfh9' style='vertical-align: top;'><a href="https://m.media-amazon.com/images/G/01/AmazonPay/ux/white_pwa.svg" target="_blank" rel="noopener noreferrer">svg</a></td>
        </tr>
    </tbody>
</table>

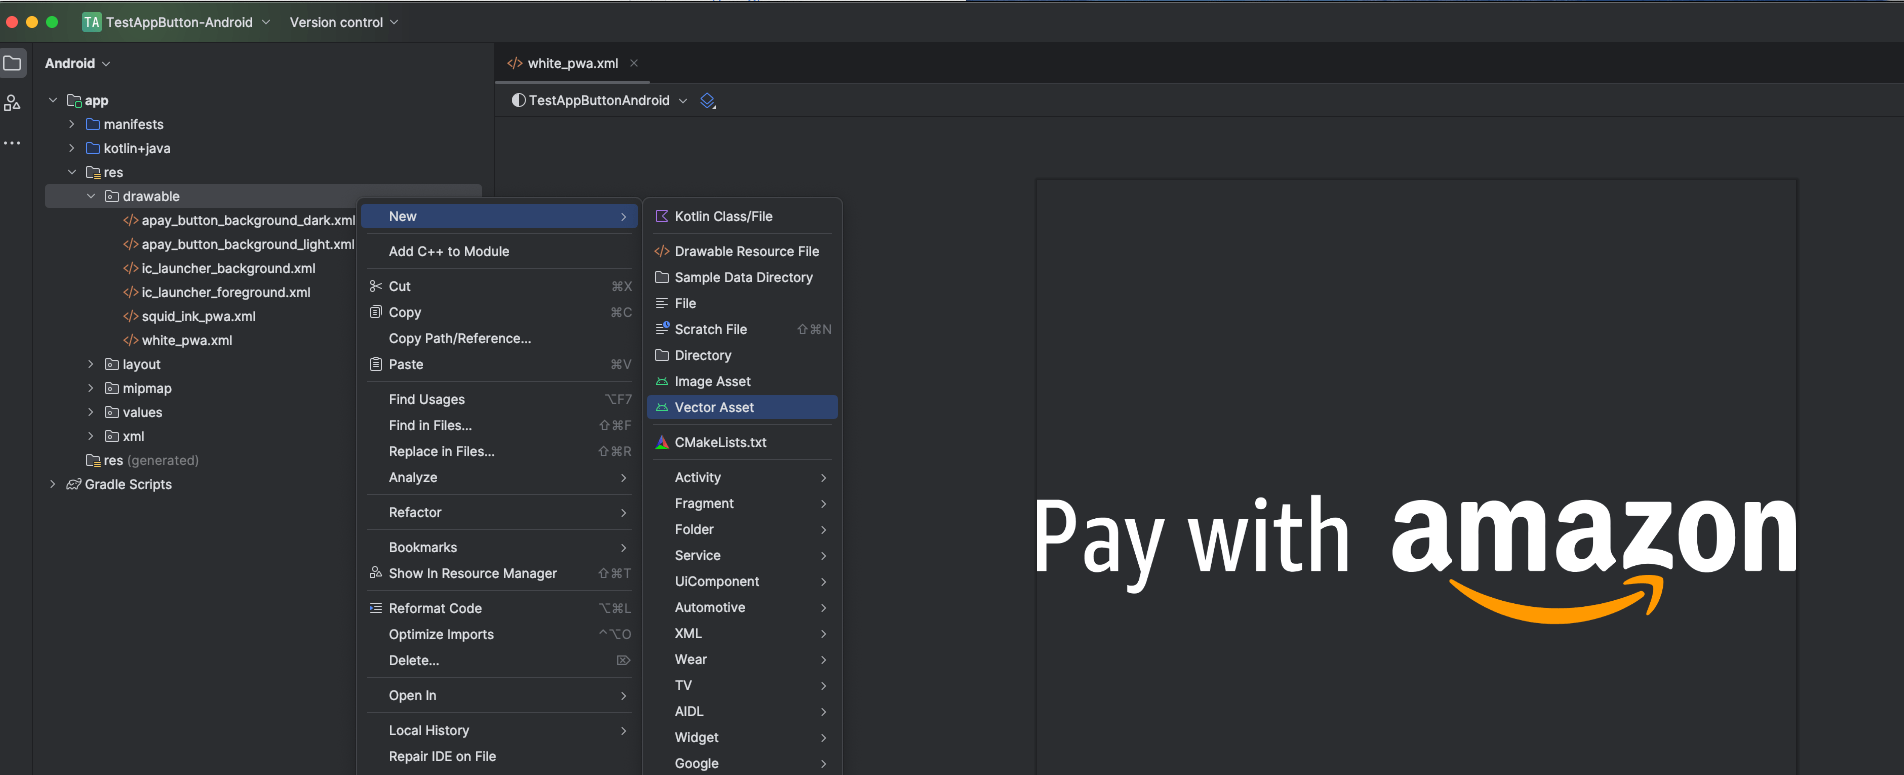
**2.** Go to the directory `app` > `res` > `drawable`, and then click `New` > `Vector Asset`. 

<img style="width: 100%" src="https://m.media-amazon.com/images/G/01/amazonpayments/documentation/Mobile_SDK/onetime-eoc/onetime-eoc-android-2._CB563458935_.png" />

**3.** Add the svg files you downloaded.

**4.** To give your button an ID, do the following:

In the button’s XML declaration, set the android:id attribute to @+id/apayButton. The Amazon Pay button is available in three variations: gold, squidInk and white. Configure the logo and background accordingly.

    - gold button
      - Set android:drawableLeft="@drawable/squid_ink_pwa" and android:background="@drawable/apay_button_background_gold"/>
    - squidInk button
      - Set android:drawableLeft="@drawable/white_pwa" and android:background="@drawable/apay_button_background_dark"/>
    - white button
      - Set android:drawableLeft="@drawable/squid_ink_pwa" and android:background="@drawable/apay_button_background_light"/>

The following code sample shows how to create an Amazon Pay button with customizable backgrounds in an Android app.

```
<!--Declare button xml in app/res/layout/activity_main.xml-->
<Button android:id="@+id/apayButton"
        android:layout_width="250dp"
        android:layout_height="50dp"
        android:drawableLeft="@drawable/squid_ink_pwa"
        android:paddingLeft="55dp"
        android:paddingTop="17dp"
        android:paddingBottom="12dp"
        android:paddingRight="55dp"
        android:gravity="center"
        android:background="@drawable/apay_button_background_gold"/>
```

```
<!--Declare background xml in app/res/drawable/apay_button_background_light.xml-->
<?xml version="1.0" encoding="utf-8"?>
<shape xmlns:android="http://schemas.android.com/apk/res/android"
    android:shape="rectangle">
    <corners android:radius="4dp" />
    <stroke android:width="1.5dp" android:color="#232F3E" />
    <solid android:color="#FFFFFF" />
</shape>
```

```
<!--Declare background xml in app/res/drawable/apay_button_background_dark.xml-->
<?xml version="1.0" encoding="utf-8"?>
<shape xmlns:android="http://schemas.android.com/apk/res/android"
    android:shape="rectangle">
    <corners android:radius="4dp" />
    <stroke android:width="1.5dp" android:color="#232F3E" />
    <solid android:color="#232F3E" />
</shape>
```

```
<!--Declare background xml in app/res/drawable/apay_button_background_gold.xml-->
<?xml version="1.0" encoding="utf-8"?>
<shape xmlns:android="http://schemas.android.com/apk/res/android"
    android:shape="rectangle">
    <corners android:radius="4dp" />
    <stroke android:width="1.5dp" android:color="#FFD814" />
    <solid android:color="#FFD814" />
</shape>
```

**4.** After initializing the Amazon Pay button in the layout XML, you can reference it in your MainActivity and attach an `OnClickListener`. Following code sample shows how to use the `OnClickListener`.

```
class MainActivity : ComponentActivity() {
    override fun onCreate(savedInstanceState: Bundle?) {
        super.onCreate(savedInstanceState)
        setContentView(R.layout.activity_main)

        findViewById<Button>(R.id.apayButton).apply {
          setOnClickListener { onButtonClicked() }
        }
    }
}
```

**5.** Load your app and make sure the button shows the text “Pay with Amazon”. Confirm the button renders correctly across all supported screen densities. For guidance on handling multiple screen densities on Android, refer to the Supporting Multiple Screens” topic’s <a href="https://developer.android.com/guide/practices/screens_support#DesigningResources" target="_blank" rel="noopener noreferrer">Alternative Layouts</a> in the "Supporting Multiple Screens" topic on `developer.android.com`.

Inside the button’s click listener, call `AmazonPayButton.initCheckout()`. The method requires 2 parameters: `context` and `jsonObject`.

The following code sample shows how to call the `initCheckout` method for the Saved Wallet End of Checkout flow with the `PayAndShip` project type.

```
@Composable
fun InitCheckoutSetupAndPayPayAndShipButton() {
    val jsonObject = JSONObject()
    jsonObject.put("merchantId", "A3LVSV45M75151")
    jsonObject.put("placement", "Cart")
    jsonObject.put("checkoutLanguage", "en_US")
    jsonObject.put("ledgerCurrency", "USD")
    jsonObject.put("productType", "PayAndShip")
    jsonObject.put("sandbox", false)
    jsonObject.put("useUniversalLink", true)
    jsonObject.put("buttonColor", "GOLD")

    val checkoutSessionConfig = JSONObject()

    // Adding storeId
    checkoutSessionConfig.put("storeId", "amzn1.application-oa2-client.e091e1fe6fdc498886a1e654170c1af5")

    // Creating webCheckoutDetails
    val webCheckoutDetails = JSONObject()
    webCheckoutDetails.put("checkoutResultReturnUrl", "https://www.testMerchant.com/return")
    webCheckoutDetails.put("checkoutCancelUrl", "https://www.testMerchant.com/cancel")
    webCheckoutDetails.put("checkoutErrorUrl", "https://www.testMerchant.com/error")
    webCheckoutDetails.put("checkoutMode", "ProcessOrder")

    // Adding webCheckoutDetails to checkoutSessionConfig
    checkoutSessionConfig.put("webCheckoutDetails", webCheckoutDetails)

    // Creating scopes array
    val scopesArray = JSONArray()
    scopesArray.put("name")
    scopesArray.put("email")
    scopesArray.put("phoneNumber")
    scopesArray.put("billingAddress")

    // Adding scopes to checkoutSessionConfig
    checkoutSessionConfig.put("scopes", scopesArray)

    // Creating paymentDetails object
    val paymentDetails = JSONObject()
    paymentDetails.put("paymentIntent", "Confirm")
    paymentDetails.put("canHandlePendingAuthorization", false)

    // Creating chargeAmount object
    val chargeAmount = JSONObject()
    chargeAmount.put("amount", "1.00")
    chargeAmount.put("currencyCode", "USD")

    // Adding chargeAmount to paymentDetails
    paymentDetails.put("chargeAmount", chargeAmount)

    // Adding paymentDetails to checkoutSessionConfig
    checkoutSessionConfig.put("paymentDetails", paymentDetails)

    // Creating PMOF fields
    checkoutSessionConfig.put("chargePermissionType", "PaymentMethodOnFile")

    val paymentMethodOnFileMetadata = JSONObject()
    paymentMethodOnFileMetadata.put("setupOnly", false)

    checkoutSessionConfig.put("paymentMethodOnFileMetadata", paymentMethodOnFileMetadata)

    // Creating addressDetails object
    val addressDetails = JSONObject()
    addressDetails.put("name", "Alice Test")
    addressDetails.put("addressLine1", "10201 Boren Ave")
    addressDetails.put("addressLine2", JSONObject.NULL)
    addressDetails.put("addressLine3", JSONObject.NULL)
    addressDetails.put("city", "Cupertino")
    addressDetails.put("districtOrCounty", JSONObject.NULL)
    addressDetails.put("stateOrRegion", "CA")
    addressDetails.put("postalCode", "95014")
    addressDetails.put("countryCode", "US")
    addressDetails.put("phoneNumber", "211901222")

    // Adding addressDetails to checkoutSessionConfig
    checkoutSessionConfig.put("addressDetails", addressDetails)

    // Adding checkoutSessionConfig to main jsonObject
    jsonObject.put("checkoutSessionConfig", checkoutSessionConfig)

    val context = LocalContext.current
    Button(
        onClick = {
            AmazonPayButton.initCheckout(context = context as AppCompatActivity, config = jsonObject)
        },
        modifier = Modifier
            .size(300f.dp, 70f.dp),
        colors = ButtonDefaults.buttonColors(Color.Magenta)) {
        Text(text = "Customized AmazonPay Button")
    }
}
```

### IOS

#### 1. Add the Amazon Pay SDK library to your iOS project

1.In Xcode, navigate to the **Build Phase** Tab.

2.Expand **Link Binary with Libraries**, and then click the **+** icon.

3.Select **Add files**, and then add the downloaded framework file.

<img style="width: 100%" src="https://m.media-amazon.com/images/G/01/amazonpayments/documentation/Mobile_SDK/onetime-eoc/onetime-eoc-ios-1._CB563458935_.png" />

4.Go to the general tab and scroll down to the **Frameworks, Libraries and Embedded Content** section.

5.Select **Embed and Sign** from the dropdown.

<img style="width: 100%" src="https://m.media-amazon.com/images/G/01/amazonpayments/documentation/Mobile_SDK/onetime-eoc/onetime-eoc-ios-2._CB563458935_.png" />


#### 2. Add dependencies

To invoke the API, ensure the library is correctly imported: - `import AmazonPayIosMSDKLib`

#### 3. Render the Amazon Pay button

To render the button, you have 2 options:
1. Invoke `renderButton` to display a Composable Amazon Pay  button.
2. Create your  button and call `initCheckout` when clicked.

##### 3.1 Call renderButton method

The `renderButton` method accepts a multiline string literal as input and returns a `UIbutton`. You can trigger one of the 5 supported flows by following  <a href="#button-render-parameters">these parameters</a>.

Here is an example of creating a Composable Amazon Pay button with the Saved Wallet End Of Checkout by calling the `renderButton` method:

```
import UIKit
import AmazonPayIosMSDKLib

class ViewController: UIViewController {
    override func viewDidLoad() {
        super.viewDidLoad()
        config=""" 
        {  
           "merchantId": "A2Y3FXLHM8H7PR",  
           "placement": "Cart",  
           "checkoutLanguage": "en_US",  
           "ledgerCurrency": "USD",  
           "productType": "PayAndShip",  
           "sandbox": false,  
           "useUniversalLink": true,  
           "checkoutSessionConfig": 
           {  
               "storeId": "amzn1.application-oa2-client.456a4c3b15d24aae96256d2f82afdd73",  
               "webCheckoutDetails": 
               {  
                   "checkoutResultReturnUrl": "https://www.testMerchant.com/return",  
                   "checkoutCancelUrl": "https://www.testMerchant.com/cancel",  
                   "checkoutErrorUrl": "https://www.testMerchant.com/error",  
                   "checkoutMode": "ProcessOrder"  
               },  
               "scopes": [  "name",  "email",  "phoneNumber",  "billingAddress"  ],  
               "paymentDetails": 
               {  
                   "paymentIntent": "Confirm",  
                   "canHandlePendingAuthorization": false,  
                   "chargeAmount": 
                   {  
                       "amount": "1.00",  
                       "currencyCode": "USD"  
                   }  
               },
               "chargePermissionType": "PaymentMethodOnFile",
               "paymentMethodOnFileMetaData": {
                   "setupOnly": false
               },  
               "addressDetails": 
               {  
                   "name": "Alice Test",  
                   "addressLine1": "829 Stendhal Ln",  
                   "addressLine2": null,  
                   "addressLine3": null,  
                   "city": "Cupertino",  
                   "districtOrCounty": null,  
                   "stateOrRegion": "CA",  
                   "postalCode": "95014",  
                   "countryCode": "US",  
                   "phoneNumber": "211901222"  
               }  
           } 
        } 
        """
        ButtonRenderer.renderButton(config: config)
}
```

##### 3.2 Render your Own Button & call InitCheckout method

You can create your own Amazon Pay button by downloading the official Amazon Pay logo.

This section provides the steps for downloading the official Pay with Amazon button label and pairing it with an iOS button.

**1.** Download Amazon Pay button labels.

<table width="100%" border="1">
    <tbody>
        <tr id='SPI9CAvz30I'>
            <td id='s:SPI9CAvz30I;SPI9CAwqfh9' style='vertical-align: top; font-weight: bold ; width: 35%' class='bold'>Name
                <br /></td>
            <td id='s:SPI9CAvz30I;SPI9CAy6rIp' style='vertical-align: top; font-weight: bold; width: 65%' class='bold'>Usage
                <br /></td>
            <td id='s:SPI9CAvz30I;SPI9CAy6rIp' style='vertical-align: top; font-weight: bold; width: 65%' class='bold'>Download-Link
                <br /></td>
        </tr>
        <tr id='SPI9CAIyYS4'>
            <td id='s:SPI9CAIyYS4;SPI9CAwqfh9' style='vertical-align: top;'>Primary label<br></td>
            <td id='s:SPI9CAIyYS4;SPI9CAwqfh9' style='vertical-align: top;'>Default label<br></td>
            <td id='s:SPI9CAIyYS4;SPI9CAwqfh9' style='vertical-align: top;'><a href="https://m.media-amazon.com/images/G/01/AmazonPay/ux/squid_ink_pwa.svg" target="_blank" rel="noopener noreferrer">svg</a></td>
        </tr>
        <tr id='SPI9CAIyYS4'>
            <td id='s:SPI9CAIyYS4;SPI9CAwqfh9' style='vertical-align: top;'>Secondary label<br></td>
            <td id='s:SPI9CAIyYS4;SPI9CAwqfh9' style='vertical-align: top;'>Use on dark background only<br></td>
            <td id='s:SPI9CAIyYS4;SPI9CAwqfh9' style='vertical-align: top;'><a href="https://m.media-amazon.com/images/G/01/AmazonPay/ux/white_pwa.svg" target="_blank" rel="noopener noreferrer">svg</a></td>
        </tr>
    </tbody>
</table>

<img style="width:100%;" src="https://m.media-amazon.com/images/G/01/amazonpayments/documentation/Mobile_SDK/onetime-eoc/onetime-eoc-ios-3._CB563458935_.png" />

**2.** Add a custom `UIButton`. The Amazon Pay button is available in three variations: gold, squidInk and white. 
**3.** Configure the required color as a parameter to `applyApayButtonStyle`.
**4.** Add the `TouchUpInside` event for the button to a method named `onButtonClicked`. Leave the implementation empty for now.

The following code sample shows how to create an Amazon Pay button with customizable backgrounds in an iOS app.

```
import UIKit

extension UIButton {

    //Styling extension for Amazon Pay Button
    func applyApayButtonStyle(buttonColor: String, x: Int, y: Int) {
        struct apayColorScheme {
            static var white: UIColor {return UIColor(red:1,green:1,blue:1,alpha:1)}
            static var squidInk: UIColor {return  UIColor(red:35/255,green:47/255,blue:62/255,alpha:1)}
            static var gold: UIColor {return UIColor(red:1,green:216/255,blue:20/255,alpha:1)}
        }
        switch buttonColor {
                case "white": 
                self.backgroundColor = apayColorScheme.white
                self.layer.borderColor = apayColorScheme.squidInk.cgColor
                    self.setImage(UIImage(named: "squid_ink_pwa"), for: .normal)
                case "squidInk":
                    self.backgroundColor = apayColorScheme.squidInk
                    self.layer.borderColor = apayColorScheme.squidInk.cgColor
                    self.setImage(UIImage(named: "white_pwa"), for: .normal)
                case "gold": fallthrough
                default:
                self.backgroundColor = apayColorScheme.gold
                    self.layer.borderColor = apayColorScheme.gold.cgColor
                    self.setImage(UIImage(named: "squid_ink_pwa"), for: .normal)
        }
        
        self.layer.borderWidth = 1.5
        self.imageView?.contentMode = .scaleAspectFit
        self.imageEdgeInsets = UIEdgeInsets(top: 12, left: 8, bottom: 8, right: 8)
        self.layer.cornerRadius = 4
        self.layer.masksToBounds = true
        self.frame = CGRect(x: x, y: y, width: 200, height: 40)
        self.tintColor = .clear
    }
}
class ViewController: UIViewController {

    override func viewDidLoad() {
        super.viewDidLoad()
        let button = UIButton(type: .custom)
        button.applyApayButtonStyle(buttonColor: "gold")
        button.addTarget(self, action: #selector(onButtonClicked), for: .touchUpInside)
        self.view.addSubview(button)
    }
    
    @objc func onButtonClicked(_ sender: Any) {
    }
}      
```

Then inside `onButtonClicked` listener, call AmazonPay’s `initCheckout` method. `initCheckout` requires 2 inputs: context and JSONObject.

Here is an example for calling `initCheckout` method with Saved Wallet End Of Checkout flow using PayAndShip product type:


```
 @objc func onButtonClicked(_ sender: Any) {
   config=""" 
    {  
        "merchantId": "A2Y3FXLHM8H7PR",  
        "placement": "Cart",  
        "checkoutLanguage": "en_US",  
        "ledgerCurrency": "USD",  
        "productType": "PayAndShip",  
        "sandbox": false,  
        "useUniversalLink": true,  
        "checkoutSessionConfig": 
        {  
            "storeId": "amzn1.application-oa2-client.456a4c3b15d24aae96256d2f82afdd73",  
            "webCheckoutDetails": 
            {  
                "checkoutResultReturnUrl": "https://www.testMerchant.com/return",  
                "checkoutCancelUrl": "https://www.testMerchant.com/cancel",  
                "checkoutErrorUrl": "https://www.testMerchant.com/error",  
                "checkoutMode": "ProcessOrder"  
            },  
            "scopes": [  "name",  "email",  "phoneNumber",  "billingAddress"  ],  
            "paymentDetails": 
            {  
                "paymentIntent": "Confirm",  
                "canHandlePendingAuthorization": false,  
                "chargeAmount": 
                {  
                    "amount": "1.00",  
                    "currencyCode": "USD"  
                }  
            },  
            "chargePermissionType": "PaymentMethodOnFile",
            "paymentMethodOnFileMetaData": {
                "setupOnly": false
            },
            "addressDetails": 
            {  
                "name": "Alice Test",  
                "addressLine1": "829 Stendhal Ln",  
                "addressLine2": null,  
                "addressLine3": null,  
                "city": "Cupertino",  
                "districtOrCounty": null,  
                "stateOrRegion": "CA",  
                "postalCode": "95014",  
                "countryCode": "US",  
                "phoneNumber": "211901222"  
            }  
        } 
    } 
    """
    ButtonRenderer.initCheckout(context: self, config: config)
 }
 ```

### Button render parameters

 <table width="100%" border="1">
     <tbody>
         <tr id='SPI9CAvz30I'>
             <td id='s:SPI9CAvz30I;SPI9CAwqfh9' style='vertical-align: top; font-weight: bold ; width: 35%' class='bold'>Parameter
                 <br /></td>
             <td id='s:SPI9CAvz30I;SPI9CAy6rIp' style='vertical-align: top; font-weight: bold; width: 65%' class='bold'>Description
                 <br /></td>
         </tr>
         <tr id='SPI9CAIyYS4'>
             <td id='s:SPI9CAIyYS4;SPI9CAwqfh9' style='vertical-align: top;'>merchantId<br>(<b>required</b>)<br><br>Type: string
                 <br /></td>
             <td id='s:SPI9CAIyYS4;SPI9CAy6rIp' style='text-align: left;vertical-align: top;'>Amazon Payments merchant account identifier
                 <br /></td>
         </tr>
         <tr id='SPI9CAw52Yq'>
             <td id='s:SPI9CAw52Yq;SPI9CAwqfh9' style='vertical-align: top;'>createCheckoutSessionConfig<br>(<b>required</b>)<br><br>Type: <a href="https://developer.amazon.com/docs/amazon-pay-checkout/amazon-pay-script.html#type-buttonConfig">buttonConfig</a>
                 <br /></td>
             <td id='s:SPI9CAw52Yq;SPI9CAy6rIp' style='text-align: left;vertical-align: top;'>Checkout Session configuration<br>Note : This is a required field if you use PayAndShip or PayOnly <code>productType</code></td>
         </tr>
          <tr id='SPI9CAf8yEh'>
                     <td id='s:SPI9CAf8yEh;SPI9CAwqfh9' style='text-align: left;vertical-align: top;'>placement<br>(<b>required</b>)<br><br>Type: string
                         <br /></td>
                     <td id='s:SPI9CAf8yEh;SPI9CAy6rIp' style='text-align: left;vertical-align: top;'>Amazon  Pay button placement on your website<br><br>Supported values:
                     <ul>
                       <li>'Home' - Initial or main page</li>
                       <li>'Product' - Product details page</li>
                       <li>'Cart' - Cart review page before buyer starts checkout</li>
                       <li>'Checkout' - Any page after buyer starts checkout</li>
                       <li>'Other' - Any page that doesn't fit the previous descriptions</li>
                     </ul>
                   </td>
                 </tr>
         <tr id='IXV9CAD2lCG'>
             <td id='s:IXV9CAD2lCG;IXV9CAYD3dl' style='text-align: left;vertical-align: top;'>ledgerCurrency<br>(<b>required</b>)<br><br>Type: string
                 <br /></td>
             <td id='s:IXV9CAD2lCG;IXV9CAsibgY' style='text-align: left;vertical-align: top;'>Ledger currency provided during registration for the corresponding Merchant ID<br><br>Supported values: 
             <ul>
                 <li>'USD' - US merchants</li>
                 <li>'EUR' - EU merchants</li>
                 <li>'GBP' - UK merchants</li>
                 <li>'JPY' - JP merchants</li>
               </ul>
             </td>
         </tr>
          <tr id='SPI9CAcT2N8'>
             <td id='s:SPI9CAcT2N8;SPI9CAwqfh9' style='vertical-align: top;'>estimatedOrderAmount<br><br>Type: <a href="https://developer.amazon.com/docs/amazon-pay-api-v2/checkout-session.html#type-price" target="_blank" rel="noopener noreferrer">price</a>
                 <br /></td>
             <td id='s:SPI9CAcT2N8;SPI9CAy6rIp' style='text-align: left;vertical-align: top;'>Estimated checkout order amount. It doesn’t match the final order amount if the buyer updates their order after starting checkout. Amazon Pay uses this value to assess transaction risk and prevent buyers from selecting incompatible payment methods for the order</td>
         </tr>
         <tr id='SPI9CAcT2N8'>
             <td id='s:SPI9CAcT2N8;SPI9CAwqfh9' style='vertical-align: top;'>productType<br><br>Type: string
                 <br /></td>
             <td id='s:SPI9CAcT2N8;SPI9CAy6rIp' style='text-align: left;vertical-align: top;'>Product type selected for checkout<br><br>Supported values:<br>
                     <ul>
                       <li>PayAndShip</li>
                       <li>PayOnly</li>
                     </ul>
               Default value: 'PayAndShip'
                <br /></td>
         </tr>
         <tr id=''>
             <td id='' style='vertical-align: top;'>buttonColor<br><br>Type: string
                 <br /></td>
             <td id='' style='text-align: left;vertical-align: top;'>Color of the Amazon Pay button<br><br>Supported values: 'Gold', 'LightGray', 'DarkGray'<br>
               Default value: 'Gold'
                 <br /></td>
         </tr>
         <tr id='SPI9CAUKjWp'>
             <td id='s:SPI9CAUKjWp;SPI9CAwqfh9' style='vertical-align: top;'>checkoutLanguage<br><br>Type: string
                 <br /></td>
             <td id='s:SPI9CAUKjWp;SPI9CAy6rIp' style='text-align: left;vertical-align: top;'>Language used to render the button and text on Amazon Pay hosted pages<br><br>Supported values: 
               <ul>
                 <li>'en_US' - US merchants</li>
                 <li>'en_GB', 'de_DE', 'fr_FR', 'it_IT', 'es_ES' - EU/UK merchants</li>
                 <li>'ja_JP' - JP merchants</li>
               </ul>
             </td>
         </tr>
         <tr id='SPI9CAvGRow'>
            <td id='s:SPI9CAvGRow;SPI9CAwqfh9' style='vertical-align: top;'>sandbox<br><br>Type: boolean
                <br /></td>
            <td id='' style='text-align: left;vertical-align: top;'>Sets button to Sandbox environment
            <br><br>Function that sets button to Sandbox environment
            <br><br>Default value: false
                <br /></td>
         </tr>
         <tr id='SPI9CAvGRow'>
            <td id='s:SPI9CAvGRow;SPI9CAwqfh9' style='vertical-align: top;'>buttonLength<br><br>Type: integer
                <br /></td>
            <td id='' style='text-align: left;vertical-align: top;'>Amazon Pay button length value in pixels
            <br><br>Default value: 40
            <br /></td>
         </tr>
         <tr id='SPI9CAvGRow'>
            <td id='s:SPI9CAvGRow;SPI9CAwqfh9' style='vertical-align: top;'>buttonWidth<br><br>Type: integer
                <br /></td>
            <td id='' style='text-align: left;vertical-align: top;'>The width value of AmazonPay button in px 
            <br><br>Default value: 200
            <br /></td>
        </tr>
         <tr id='SPI9CAvGRow'>
            <td id='s:SPI9CAvGRow;SPI9CAwqfh9' style='vertical-align: top;'>useUniversalLink<br><br>Type: boolean
                <br /></td>
            <td id='' style='text-align: left;vertical-align: top;'>Setting determining if MSDK redirects buyer from merchant’s App to the Amazon app for checkout when the Amazon app is installed 
            <br><br>Default value: true
            <br /></td>
        </tr>
     </tbody>
 </table>

### CheckoutSessionConfig Fields
<table width="100%" border="1">
    <tbody>
        <tr>
            <td style="vertical-align: top; font-weight: bold; width: 30%;">Name</td>
            <td style="vertical-align: top; font-weight: bold; width: 20%;">Location</td>
            <td style="vertical-align: top; font-weight: bold; width: 50%;">Description</td>
        </tr>
        <tr>
            <td style="vertical-align: top;">storeId<br><b>(<b>required</b>)</b><br><br>Type: string</td>
            <td style="vertical-align: top;">Body</td>
            <td style="vertical-align: top;">Amazon Pay store ID. Retrieve this value from Integration Central: <a href="https://sellercentral.amazon.com/gp/pyop/seller/integrationcentral/" target="_blank" rel="noopener noreferrer">US</a>, <a href="https://sellercentral-europe.amazon.com/gp/pyop/seller/integrationcentral/" target="_blank" rel="noopener noreferrer">EU</a>, <a href="https://sellercentral-japan.amazon.com/gp/pyop/seller/integrationcentral/" target="_blank" rel="noopener noreferrer">JP</a></td>
        </tr>
        <tr>
            <td style="vertical-align: top;">webCheckoutDetails<br><br>Type: <a href="#type-webcheckoutdetails">webCheckoutDetails</a></td>
            <td style="vertical-align: top;">Body</td>
            <td style="vertical-align: top;">URLs associated with the Checkout Session used to complete checkout.<br> Note: URLs must use HTTPS protocol and be configured as Universal links in iOS, or App links in Android.<br> Use <code>checkoutMode</code> to specify whether the buyer completes checkout on the Amazon Pay hosted page immediately after clicking the Amazon Pay button.</td>
        </tr>
        <tr>
            <td style="vertical-align: top;">paymentDetails<br><br>Type: <a href="#type-paymentdetails">paymentDetails</a></td>
            <td style="vertical-align: top;">Body</td>
            <td style="vertical-align: top;">Payment details specified by the merchant, such as order amount and method for charging the buyer.</td>
        </tr>
        <tr>
            <td style="vertical-align: top;">addressDetails<br><br>Type: <a href="https://developer.amazon.com/it/docs/amazon-pay-api-v2/checkout-session.html#type-addressdetails" target="_blank" rel="noopener noreferrer">addressDetails</a></td>
            <td style="vertical-align: top;">Body</td>
            <td style="vertical-align: top;">Shipping address provided by the buyer.<br> Note: Only use this parameter if <code>checkoutMode</code> is <code>ProcessOrder</code> and <code>productType</code> is <code>PayAndShip</code>.</td>
        </tr>
        <tr>
            <td style="vertical-align: top;">scopes<br><br>Type: list&lt;string&gt;</td>
            <td style="vertical-align: top;">Body</td>
            <td style="vertical-align: top;">Buyer details you're requesting access to. Specify whether you need shipping address using the <code>productType</code> parameter. Supported values:
                <ul>
                    <li>'name' - Buyer name</li>
                    <li>'email' - Buyer email</li>
                    <li>'phoneNumber' - Buyer phone number. You must also request <code>billingAddress</code> scope or use <code>payAndShip</code> productType to retrieve the billing address or shipping address phone number.</li>
                    <li>'billingAddress' - Default billing address</li>
                    <li>'shippingAddress' - Default shipping address</li>
                </ul>
                Note: You must also request <code>billingAddress</code> scope or use <code>payAndShip</code> productType to retrieve the billing address or shipping address phone number.<br> Default value: All buyer information (except billing address) is requested if the scopes parameter is not set.
            </td>
        </tr>
        <tr>
            <td style="vertical-align: top;">chargePermissionType<br><br>Type: string</td>
            <td style="vertical-align: top;">Body</td>
            <td style="vertical-align: top;">Type of charge permission requested<br>Supported values:
                <ul>
                    <li>'OneTime' - The Charge Permission can only be used for a single order</li>
                    <li>'Recurring' - Charge permission can be used for recurring orders.</li>
                </ul>
                Default value: 'OneTime'
            </td>
        </tr>
        <tr>
            <td style="vertical-align: top;">deliverySpecifications<br><br>Type: <a href="https://developer.amazon.com/it/docs/amazon-pay-api-v2/checkout-session.html#type-deliveryspecifications" target="_blank" rel="noopener noreferrer">deliverySpecifications</a></td>
            <td style="vertical-align: top;">Body</td>
            <td style="vertical-align: top;">Shipping restrictions to prevent buyers from selecting unsupported addresses from their Amazon address book.</td>
        </tr>
        <tr>
            <td style="vertical-align: top;">merchantMetadata<br><br>Type: <a href="https://developer.amazon.com/it/docs/amazon-pay-api-v2/checkout-session.html#type-merchantmetadata" target="_blank" rel="noopener noreferrer">merchantMetadata</a></td>
            <td style="vertical-align: top;">Body</td>
            <td style="vertical-align: top;">Order details provided by the merchant.</td>
        </tr>
    </tbody>
</table>
 
#### Type: webCheckoutDetails
 
<table width="100%" border="1">
    <tbody>
        <tr id="ERL9CAz5j6a">
            <td id="s:ERL9CAz5j6a;ERL9CAAufZX" style="vertical-align: top; font-weight: bold; width: 30%;" class="bold">Parameter</td>
            <td id="s:ERL9CAz5j6a;ERL9CAneSOW" style="vertical-align: top; font-weight: bold; width: 70%;" class="bold">Description</td>
        </tr>
        <tr id="ERL9CA6eLjw">
            <td id="s:ERL9CA6eLjw;ERL9CAAufZX" style="vertical-align: top;">checkoutResultReturnUrl<br><br>Type: string</td>
            <td id="s:ERL9CA6eLjw;ERL9CAneSOW" style="vertical-align: top;">Needs to be a <em>Universal link</em> or <em>App link</em>. It will be triggered after buyer placing the payment.<br><br>If this is a universal link, the domain of this url needs to be added to your JavaScript Origins in Seller Central.</td>
        </tr>
        <tr id="ERL9CAxQRXB">
            <td id="s:ERL9CAxQRXB;ERL9CAAufZX" style="vertical-align: top;">checkoutCancelUrl<br><br>Type: string</td>
            <td id="s:ERL9CAxQRXB;ERL9CAneSOW" style="vertical-align: top;">Needs to be a <em>Universal link</em> or <em>App link</em> with merchant domain. It will be triggered after buyer canceled the checkout flow. (where we trigger onCancel() callback in Falcon web flow)<br><br>If this is a universal link, the domain of this url needs to be added to your JavaScript Origins in Seller Central.</td>
        </tr>
        <tr>
            <td style="vertical-align: top;">checkoutErrorUrl<br><br>Type: string</td>
            <td style="vertical-align: top;">Newly added in MSDK EoC flow, needs to be a <em>Universal link</em> or <em>App link</em> with merchant domain. It will be triggered when buyer clicks on cancel and redirect to merchant link in error page<br><br>If this is a universal link, the domain of this url needs to be added to your JavaScript Origins in Seller Central.</td>
        </tr>
        <tr>
            <td style="vertical-align: top;">checkoutMode<br><br>Type: string</td>
            <td style="vertical-align: top;">This value must be <em>ProcessOrder</em>.</td>
        </tr>
    </tbody>
</table>

#### Type: paymentDetails
 
<table width="100%" border="1">
    <tbody>
        <tr id="ERL9CAXIylR">
            <td id="s:ERL9CAXIylR;ERL9CAW9hIG" style="vertical-align: top; font-weight: bold; width: 30%;" class="bold">Parameter</td>
            <td id="s:ERL9CAXIylR;ERL9CAxLjJC" style="vertical-align: top; font-weight: bold; width: 70%;" class="bold">Description</td>
        </tr>
        <tr id="ERL9CA8cLyf">
            <td id="s:ERL9CA8cLyf;ERL9CAW9hIG" style="vertical-align: top;">paymentIntent<br><br>Type: string</td>
            <td id="s:ERL9CA8cLyf;ERL9CAxLjJC" style="vertical-align: top;">Payment flow to charge the buyer<br><br>Supported values:
                <ul>
                    <li>'Confirm' - Create a Charge Permission to authorize and capture funds at a later time</li>
                    <li>'Authorize' - Authorize funds immediately and capture at a later time</li>
                    <li>'AuthorizeWithCapture' - Authorize and capture funds immediately. If you use this <code>paymentIntent</code>, you can't set <code>canHandlePendingAuthorization</code> to true.</li>
                </ul>
            </td>
        </tr>
        <tr id="ERL9CAlQj26">
            <td id="s:ERL9CAlQj26;ERL9CAW9hIG" style="vertical-align: top;">canHandlePendingAuthorization<br><br>Type: boolean</td>
            <td id="s:ERL9CAlQj26;ERL9CAxLjJC" style="vertical-align: top;">Boolean that indicates whether the merchant can handle a pending response<br><br>If set to true:
                <ul>
                    <li>One-time checkout: Dynamic authorization is enabled. The Charge will either be in an "Authorized", "Declined", or "AuthorizationInitiated" state. If the Charge is in an "AuthorizationInitiated" state, Amazon Pay will process the authorization asynchronously, and you will receive authorization results within 24 hours. See <a href="https://developer.amazon.com/docs/amazon-pay-checkout/asynchronous-processing.html" target="_blank" rel="noopener noreferrer">asynchronous processing</a> and <a href="https://developer.amazon.com/docs/amazon-pay-api-v2/charge.html#states-and-reason-codes" target="_blank" rel="noopener noreferrer">Charge states</a> for more info.</li>
                    <li>Recurring checkout: Amazon Pay will process the authorization asynchronously, and you will receive authorization results within 24 hours. See <a href="https://developer.amazon.com/docs/amazon-pay-checkout/asynchronous-processing.html" target="_blank" rel="noopener noreferrer">asynchronous processing</a> for more info.</li>
                </ul>
            </td>
        </tr>
        <tr id="ERL9CAm6rqs">
            <td id="s:ERL9CAm6rqs;ERL9CAW9hIG" style="vertical-align: top;">chargeAmount<br><br>Type: <a href="https://developer.amazon.com/docs/amazon-pay-api-v2/checkout-session.html#type-price">price</a></td>
            <td id="s:ERL9CAm6rqs;ERL9CAxLjJC" style="vertical-align: top;">Final charged amount</td>
        </tr>
    </tbody>
</table>